Flux-cored arc welding can produce strong, high-deposition welds, but even small setup or technical errors can lead to serious weld quality problems. Common FCAW welding mistakes & defects often come from incorrect voltage and wire feed settings, poor gun angle control, contaminated base metal, or improper travel speed.
These issues can cause porosity, slag inclusions, lack of fusion, excessive spatter, undercut, and unstable arc performance that weaken the weld and increase rework costs.
In production welding and structural fabrication, these defects do more than affect appearance. They can reduce penetration consistency, create inspection failures, and compromise joint strength under load. Understanding why these problems happen is critical for maintaining weld integrity and improving process efficiency.
This guide breaks down the most frequent FCAW welding mistakes, the defects they create, and the practical adjustments that help produce cleaner, more reliable welds in real shop and field conditions.
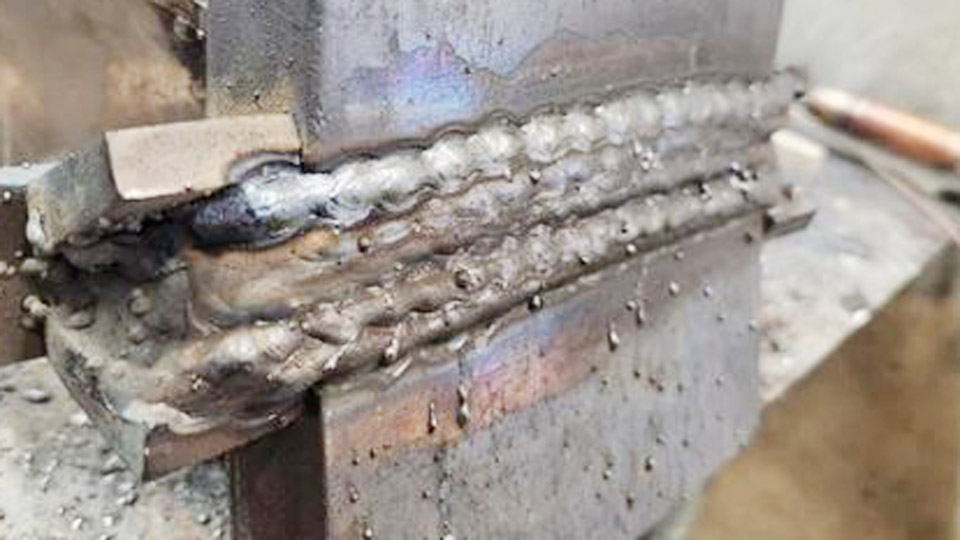
Image by reddit
Why is My Weld Full of Tiny Holes? (Porosity and “Wormholes”)
Porosity is the bane of every flux-cored welder. It looks like a sponge or a series of tiny craters on the surface or, more dangerously, deep within the weld throat. In FCAW, we often deal with a specific type called “piping porosity” or wormholes.
What it is and How it Works
Porosity happens when gas is trapped in the molten weld pool as it solidifies. With gas-shielded FCAW (FCAW-G), this is usually an atmospheric issue. With self-shielded wire (FCAW-S), it’s often a chemistry issue. The gas can’t escape before the metal freezes, leaving a hollow cavity that severely weakens the joint.
When and Why it Happens
You’ll see this most often when working outdoors or in drafty shops. If your shielding gas is blown away, or if the internal flux in your wire hasn’t been kept dry, moisture turns into hydrogen gas under the heat of the arc.
Practical Tips to Fix It
Check your Stick-out: FCAW requires a longer Electrode Extension (ESO) than MIG. For most .045″ wires, you need 1/2″ to 3/4″ of stick-out. If you’re too close, you’ll overheat the wire and lose gas coverage.
Surface Prep: Flux-core is marketed as “dirty metal capable,” but that’s a trap. While it handles light rust better than MIG, heavy mill scale, oil, or moisture will cause porosity every time. Hit it with a flapper disc first.
Gas Flow: If using dual-shield, set your flow meter between 35 and 45 CFH. Too low and the wind wins; too high and you create turbulence that sucks air into the weld.
Why am I Getting Slag Trapped in the Metal? (Slag Inclusions)
One of the most common FCAW welding mistakes involves “slag inclusions,” where the non-metallic flux becomes trapped inside the weld metal.
What it is and How it Works
Slag is designed to float to the top of the weld pool to protect it. An inclusion occurs when the slag is either outrun by the puddle or pushed into the root by poor torch angle. If you’re welding over a previous bead that wasn’t cleaned properly, you’re essentially “burying” old glass inside your new metal.
When and Why it Happens
This is prevalent in multi-pass welds. If you don’t use a chipping hammer and a wire brush between passes, the next layer won’t fuse to the metal; it will fuse to the slag. It also happens when your voltage is too low, making the puddle too sluggish to let the slag float.
Practical Tips to Fix It
The “Drag” Technique: Remember the rule: “If there’s slag, you must drag.” Never push a flux-core weld. Dragging the puddle keeps the slag at the back of the pool, preventing it from getting trapped underneath.
Increase Voltage: If the puddle feels “stiff,” bump your voltage up by 1-2 volts. This thins the slag and allows it to rise to the surface more efficiently.
Joint Geometry: If you’re welding a tight V-groove, make sure the opening is wide enough (60-degree included angle) so the wire can reach the bottom without the slag rolling ahead.
Dealing with Lack of Fusion and “Cold Lap”
You might have a bead that looks like a “stack of dimes,” but if it isn’t actually melted into the base metal, it’s just a decorative piece of metal sitting on top.
What it is and How it Works
Lack of fusion (LOF) or “cold lap” occurs when the arc doesn’t melt the base metal’s surface enough for the filler to bond. In FCAW, this is often hidden because the large slag blanket makes the weld look wider and deeper than it actually is.
When and Why it Happens
This is common when welders try to weld “downhill” on thick plate. The molten metal and slag move faster than the arc, acting as an insulator between the arc and the base metal.
Practical Tips to Fix It
Watch the Leading Edge: Your arc should always be at the very front of the puddle. If the puddle starts to get ahead of your wire, speed up your travel or adjust your angle.
Heat Input: Ensure your amperage (Wire Feed Speed) is matched to your material thickness. For 1/4″ plate using .035″ wire, you should be in the neighborhood of 250-300 IPM.
Oscillation Limits: Don’t weave too wide. A “Z” pattern is fine, but if you go too wide, the edges of the weld will cool down before you return, leading to cold shuts.
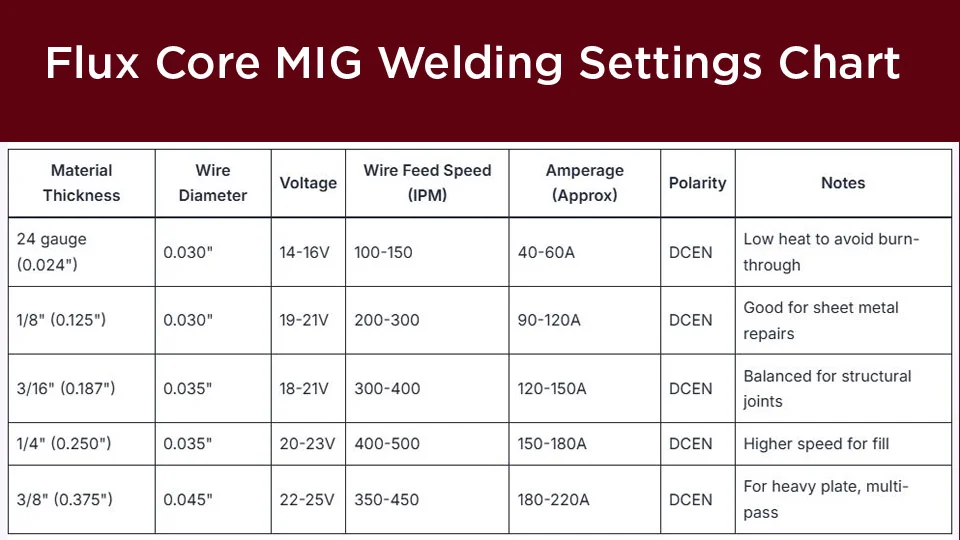
Understanding Wire Selection and Amperage Ranges
Choosing the right electrode is the foundation of a defect-free weld. In the US, the most common wires you’ll encounter are E71T-1 (Dual Shield) and E71T-11 (Self-Shield).
Electrode Classifications and Diameters
| Wire Type | Use Case | Typical Diameter | Amperage Range |
| E71T-1 (Gas Shielded) | Heavy fabrication, structural steel | .045″ | 150 – 280A |
| E71T-11 (Self-Shielded) | Outdoor repair, DIY, thin gauge | .035″ | 40 – 150A |
| E70T-4 (Self-Shielded) | High deposition, flat/horizontal only | 1/16″ | 200 – 400A |
Practical Advice on Amperage
Amperage in FCAW is controlled by your Wire Feed Speed (WFS). If you are blowing through the metal, don’t just turn down the wire; you must also balance the voltage. If your wire is “stubbing” into the plate, your voltage is too low for your WFS. If the wire is melting back into the contact tip (burn-back), your voltage is too high.
Machine Settings and Joint Preparation
Setting up your rig for FCAW is different than MIG. The polarity is the first thing people get wrong.
Polarity Settings
FCAW-G (Dual Shield): Use DCEP (Electrode Positive). This provides the deep penetration required for structural work.
FCAW-S (Self-Shield): Almost always uses DCEN (Electrode Negative). If you run self-shielded wire on DCEP, you’ll get massive spatter and a very unstable arc.
Joint Prep Steps
Beveling: For anything over 3/16″, a 30-degree bevel on each side (60 total) is standard.
Land: Leave a small flat “land” (about 1/16″) at the bottom of your bevel to prevent the arc from blowing through the root.
Cleaning: Use a dedicated stainless steel brush for aluminum or a standard carbon steel brush for mild steel to remove oils.
Safety Considerations in the Flux-Cored World
FCAW produces significantly more smoke and fumes than MIG or TIG. The flux contains deoxidizers and scavengers that are effective for the weld but harsh on the lungs.
Fume Extraction: Always use a fume extractor or a fan positioned to pull smoke away from your face—not blow it across the weld (which causes porosity).
UV Protection: FCAW is a very “bright” process. Use a shade 10 or 11 lens at minimum.
Spatter Protection: Because FCAW spatters more than MIG, leather sleeves and a heavy-duty apron are highly recommended to prevent “the welder’s itch” (burns from sparks).
Improving Your Technique: Step-by-Step for a Flat Fillet
- Set the Angle: Hold the gun at a 15-to-20-degree drag angle.
- Establish the Arc: Clip your wire to a point. Pull the trigger and maintain a 3/4″ stick-out.
- Watch the Puddle: Look past the bright light. You should see the slag forming a “shelf” behind the arc.
- Steady Travel: Move at a pace that keeps the weld bead width about 2 to 3 times the diameter of the wire.
- Termination: At the end of the weld, back up about 1/4″ into the crater before letting go of the trigger to prevent “crater cracks.”
Mastering the Nuances of Flux-Core
When we look at the mechanics of FCAW, we’re essentially combining the speed of wire-feed with the metallurgical benefits of stick welding. It is a robust, forgiving process once you respect its rules. Most of the Common FCAW Welding Mistakes & Defects we see in the shop come down to two things: ignoring the stick-out length and fighting the slag by pushing the puddle.
Final Thoughts
By focusing on a steady drag angle, ensuring your polarity matches your wire type, and keeping your joint prep clean, you turn FCAW from a “messy” process into a high-production tool. Whether you’re fixing a plow in a frozen field in Nebraska or welding I-beams for a new warehouse, these principles remain the same.
The goal is always the same: a weld that is as strong as the steel it joins, with a smooth, glass-like slag that pops off with a single tap of the hammer.
Pro-Tip from the Shop Floor: If you’re struggling with the slag being hard to remove, your voltage is likely too low. A well-tuned FCAW bead will have “self-peeling” slag. If you have to grind the slag off, bump your voltage up by 0.5V increments until the slag starts to curl up on its own as it cools.
Frequently Asked Questions
Can I use the same gas for FCAW as I do for MIG?
For Dual-Shield (FCAW-G), the standard is 75% Argon / 25% CO2 (C25) or 100% CO2. Standard MIG gas (C25) works great and provides a smoother arc, but 100% CO2 offers deeper penetration and is cheaper. Never use straight Argon; it will cause the arc to be extremely unstable.
Why does my wire keep “nesting” or bird-nesting at the drive rolls?
Flux-cored wire is tubular (hollow). If you use the same drive roll tension as you do for solid MIG wire, you will crush the tube, causing it to deform and jam. Use knurled drive rolls and keep the tension just tight enough to feed the wire without slipping.
Do I really need to clean the metal if the wire has flux?
Yes. While the flux has “scavengers” to pull out impurities, it has a limit. Heavy rust, paint, or zinc galvanization will lead to inclusions and poor penetration. A 30-second pass with a grinder will save you 30 minutes of grinding out a failed weld.
How do I stop the “spatter” from sticking to my nozzle?
FCAW is notorious for spatter. Use a ceramic-based anti-spatter spray on your nozzle and contact tip. Also, ensure your stick-out isn’t too short; short stick-outs increase spatter buildup significantly.