Incorrect parameter selection in flux-cored welding directly affects penetration, bead profile, and arc stability. A Flux Core MIG Welding Settings Chart provides the baseline values needed to match voltage, wire feed speed, and polarity to material thickness and wire type.
Without these references, operators risk cold lap, excessive spatter, burn-through, or lack of fusion—issues that lead to rework, failed inspections, and increased consumable costs.
Flux-cored processes are less forgiving than solid wire MIG when settings drift outside optimal ranges. Variations in shielding (self-shielded vs gas-shielded), electrode diameter, and joint configuration all demand precise adjustments. A properly structured chart removes guesswork and standardizes setup across different jobs and materials.
I’ll discuss the accurate starting parameters and explains how to fine-tune them under real welding conditions, helping you maintain consistent weld quality, control heat input, and reduce defects in production or field applications.
Why Flux Core Settings Aren’t Just “MIG Without Gas”
One of the most common mistakes I see in the shop is treating Flux Core like it’s just standard MIG welding without a bottle of 75/25. It isn’t.
Flux Core wire is a hollow tube filled with deoxidizers and slag-forming agents. This design allows it to handle rusty or dirty metal much better than solid wire, but it also changes the physics of the arc.
What are Flux Core Settings?
In the world of Flux Core, you are primarily balancing two variables: Voltage (V) and Wire Feed Speed (WFS). Unlike Stick welding (SMAW), where you set the amperage on the machine, with a wire feeder, your amperage is a byproduct of your wire speed.
How it Works
When you pull the trigger, the machine maintains a constant voltage. As the wire hits the metal, the resistance creates heat. If your wire speed is too high for the voltage, the wire will “stub” into the plate. If it’s too low, the arc will burn back into the contact tip.
Finding that “sweet spot” ensures the flux inside the wire can properly shield the molten puddle from the nitrogen and oxygen in the air.
When to Use These Settings
You lean on Flux Core when you’re working outdoors where wind would blow shielding gas away, or when you’re working on thicker materials that need deep penetration. It’s the “all-terrain” version of welding.
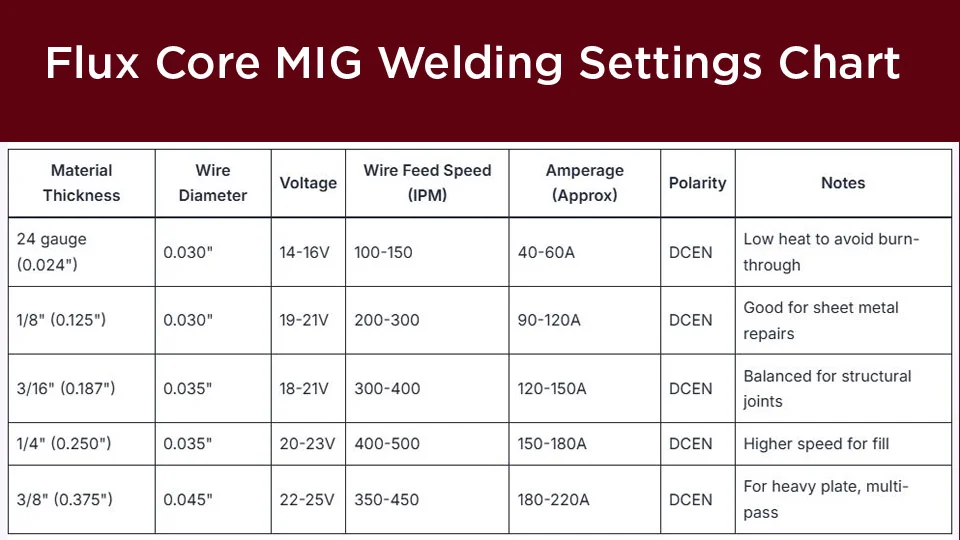
The Master Flux Core MIG Welding Settings Chart
This chart provides a baseline for Gasless Flux Core (E71T-11), which is the most common wire used by hobbyists and mobile repair units. Note that these are starting points; every machine—from a Millermatic to a Hobart or a Lincoln—runs slightly differently depending on your input power (110V vs. 220V).
Baseline Settings for .030″ and .035″ Wire
| Material Thickness | Wire Diameter | Voltage (V) | Wire Feed Speed (IPM) | Amperage Range |
| 18 Gauge (~1.2mm) | .030″ | 14 – 15 | 80 – 100 | 40 – 60A |
| 14 Gauge (~1.9mm) | .030″ | 15 – 16 | 110 – 130 | 70 – 90A |
| 1/8″ (3.2mm) | .035″ | 16 – 17 | 140 – 160 | 100 – 120A |
| 3/16″ (4.8mm) | .035″ | 17 – 18 | 180 – 200 | 125 – 150A |
| 1/4″ (6.4mm) | .035″ | 19 – 21 | 220 – 250 | 160 – 180A |
| 3/8″ (9.5mm) | .045″ | 22 – 24 | 200 – 230 | 200 – 230A |
Pro Tip: If you are using a 110V “cracker box” welder, you will likely max out your machine at 1/8″ or 3/16″. For 1/4″ and up, a 220V machine is almost always necessary to get the penetration required for a safe joint.
How Do I Set My Wire Feed Speed Properly?
Beginners often get frustrated because their machine’s dial says “1 to 10” instead of Inches Per Minute (IPM). If your manual doesn’t have a conversion, here is how you solve it.
What it is
Wire Feed Speed (WFS) determines your amperage. The faster the wire comes out, the more “fuel” you are giving the fire. If you see your arc jumping or the wire “stubbing” against the metal, your WFS is too high for the voltage you’ve selected.
Practical Tips for Dialing In
The 6-Second Test: Pull the trigger for exactly 6 seconds and catch the wire. Measure the length in inches and multiply by 10. That is your IPM.
Listen to the Sound: A perfect Flux Core arc sounds like a steady, aggressive sizzle. If it sounds like a series of “pops,” your wire speed is too low.
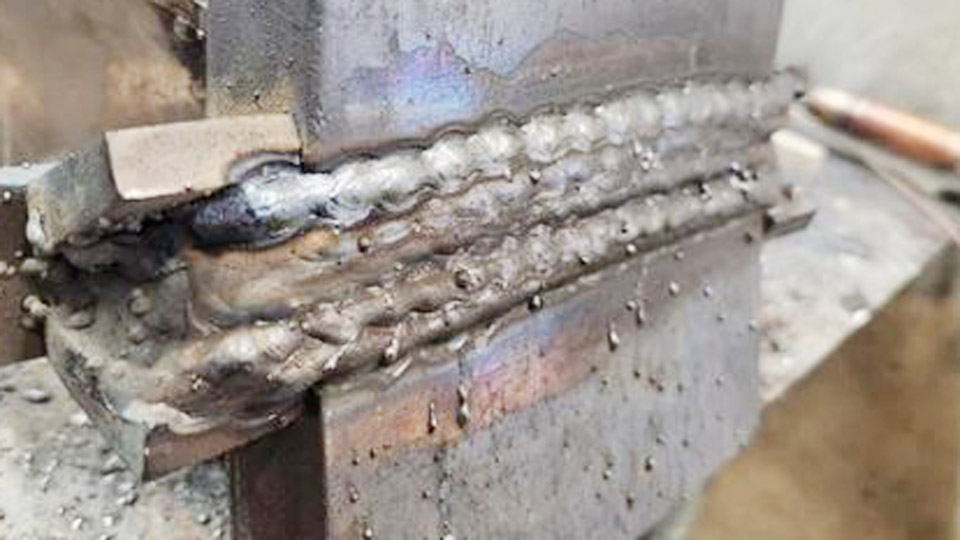
Watch the Puddle: Flux Core produces a lot of slag. You need to distinguish between the molten metal and the molten slag. If your wire speed is too high, the puddle will become turbulent and messy.
Why is Polarity the “Silent Killer” of Flux Core Welds?
I’ve seen guys spend three hours trying to “fix” their machine settings when the only problem was the cables were backwards.
The Polarity Rule
- MIG (Solid Wire): Uses DCEP (Direct Current Electrode Positive). The “torch” is positive.
- Gasless Flux Core: Uses DCEN (Direct Current Electrode Negative). The “torch” is negative.
Why it Matters
In DCEN, more heat is concentrated on the wire than the workpiece. Because Flux Core wire is thin and hollow, it needs that heat to melt the internal flux properly. If you run Flux Core on DCEP, you’ll get massive amounts of spatter, a wandering arc, and very shallow penetration.
Check your machine’s internal terminals. Usually, there are two large wing nuts or bolts near the wire drive. Swap them according to the diagram on the inside of the door. It makes a world of difference.
Selecting the Right Wire: E71T-11 vs. E71T-GS
Not all flux-cored wires are created equal. Using the wrong one for the job can lead to weld cracking or poor mechanical properties.
E71T-11
This is the “standard” gasless wire. It’s a multi-pass wire, meaning you can stack beads on top of each other for thick plates. It’s excellent for general fabrication and repair.
E71T-GS
The “GS” stands for General Specialty or Single Pass. Do not use this for structural work. It is designed for thin-gauge galvanized steel and should only be used for a single bead. If you try to stack beads with GS wire, the weld can become brittle and snap.
Practical Selection Tip
If you’re fixing a gate or a lawnmower deck, E71T-11 is your best friend. If you’re just tacking together some thin sheet metal for a non-structural art project, the GS wire is fine.
Joint Preparation: Do I Really Need to Grind?
One of the big selling points of Flux Core is that it can “handle” rust and mill scale. While that’s true compared to MIG, it’s not an excuse to be lazy.
How it Works
The flux inside the wire contains scavengers that pull impurities out of the molten metal and into the slag. However, if there is too much rust or heavy paint, those scavengers get overwhelmed. This leads to porosity—tiny holes in your weld that look like a sponge.
Practical Steps
Clean the Ground: Always grind a clean spot for your ground clamp. A poor ground will cause your voltage to fluctuate, ruining your settings.
Beveling: For any material 3/16″ or thicker, grind a 45-degree bevel on the edges. This allows the arc to reach the bottom of the joint, ensuring full fusion.
The 1/2-inch Rule: Grind back at least 1/2 inch from the weld zone. This prevents paint or grease from being sucked into the arc.
The “Drag” Technique: Why We Don’t Push Flux Core
In standard MIG welding, many people prefer the “push” technique (pointing the gun toward the direction of travel). In Flux Core, we almost always drag the gun (pointing the gun back toward the finished weld).
Why and When to Use It
The old saying in welding is: “If there’s slag, you must drag.”
Dragging the puddle keeps the arc at the leading edge of the melt. If you push, you risk “trapping” the molten slag underneath the weld metal. This creates slag inclusions—pockets of stone-like material inside your steel that make the weld incredibly weak.
Practical Tip
Keep your “drag angle” between 10 and 15 degrees. If you tilt the gun too far back, you’ll lose penetration and increase spatter.
Common Mistakes and How to Fix Them
1. Excessive Spatter
Even with a perfect Flux Core MIG welding settings chart, you’ll get some spatter. However, if it looks like a firework went off, your voltage is likely too high or your “stick-out” is too short.
The Fix: Lower your voltage or increase your wire stick-out (the distance from the tip to the metal) to about 1/2″ to 3/4″.
2. Lack of Fusion (Cold Lap)
This happens when the weld sits on top of the metal rather than melting into it. Usually, this is caused by low voltage or moving too fast.
The Fix: Turn up the heat (voltage) and slow down your travel speed. Ensure the arc is focused on the “root” of the joint.
3. Bird Nesting
This is when the wire tangles up inside the drive rolls. Because flux core wire is soft, you cannot crank down the tensioner like you do with solid wire.
The Fix: Use “knurled” drive rolls (they have tiny teeth to grip the soft wire) and keep the tension just tight enough to feed without slipping.
Transitioning Skills: From Flux Core to Other Processes
Once you master the arc control required for Flux Core, you are well-positioned to understand other heavy-duty processes like SMAW (Stick Welding) or even Ultrasonic Spot Welding in industrial settings. While the tools change, the fundamental understanding of heat input, material thickness, and joint integrity remains the same.
Whether you are using high-frequency sound waves to fuse plastics or a 200-amp arc to fuse bridge girders, the logic of “material compatibility” and “setting calibration” is a universal language.
Summary of Best Practices
To wrap this up and get you back to the workbench, remember these key takeaways:
- Polarity is Paramount: Always check that you are running DCEN (Electrode Negative) for gasless wire.
- Consult the Chart: Use the voltage and WFS ranges provided as a starting point, then fine-tune based on the “sizzle” of the arc.
- Cleanliness Matters: Even a little grinding goes a long way in preventing porosity.
- Drag, Don’t Push: Keep the slag behind the puddle to ensure a clean, strong bead.
- Know Your Wire: Use E71T-11 for structural or multi-pass work; avoid E71T-GS for anything that needs to hold weight.
You’re now better equipped to handle the nuances of wire-fed welding. The key to confidence in the shop isn’t memorizing every number—it’s knowing how to read the puddle and adjust your machine until the metal does exactly what you want it to do.
Advanced Tip
Keep a “welding diary” or a sharpie-written note on the inside of your welder’s door. Every time you find a setting that works perfectly for a specific job, write it down. Voltage, Wire Speed, and Wire Brand. Atmospheric conditions like humidity can change how a machine runs, so having your own shop-tested data is more valuable than any factory sticker.
Frequently Asked Questions
Why is my flux core weld so “dirty” compared to MIG?
Flux core produces a layer of slag to protect the weld. This is normal. Unlike MIG, which uses gas to keep the air out, Flux Core uses a chemical reaction that leaves a “crust.” A quick pass with a wire brush or a chipping hammer will reveal the clean weld underneath.
Can I use Flux Core wire with shielding gas?
There is a specific type called “Dual Shield” (FCAW-G) that requires gas (usually 100% CO2 or 75/25). However, the “gasless” wire (FCAW-S) we discussed here should not be used with gas, as it can actually cause the weld to become overly brittle.
What is the ideal “stick-out” for flux core?
For standard MIG, you want about 1/4″ to 3/8″ of wire sticking out. For Flux Core, you need more: 1/2″ to 3/4″. This extra length allows the wire to “pre-heat” before it hits the arc, which helps the flux work more effectively and reduces spatter.