The Flux Core Welding Amperage Chart is one of the most important reference tools for setting a welding machine correctly. Flux-cored wire requires a specific amperage range based on wire diameter, material thickness, and welding position.
Running too little amperage can cause poor fusion and lack of penetration, while excessive amperage may lead to burn-through, excessive spatter, distortion, and unnecessary rework.
In real fabrication and repair work, amperage directly affects arc stability, bead profile, weld strength, and overall productivity. Even experienced welders rely on amperage charts as a starting point before fine-tuning settings for specific joint configurations and material conditions.
Understanding how to read and apply a flux core welding amperage chart helps reduce setup errors, improve weld quality, and achieve more consistent results across a wide range of steel thicknesses. I’ll explain the recommended amperage ranges and how to adjust them for practical welding applications.
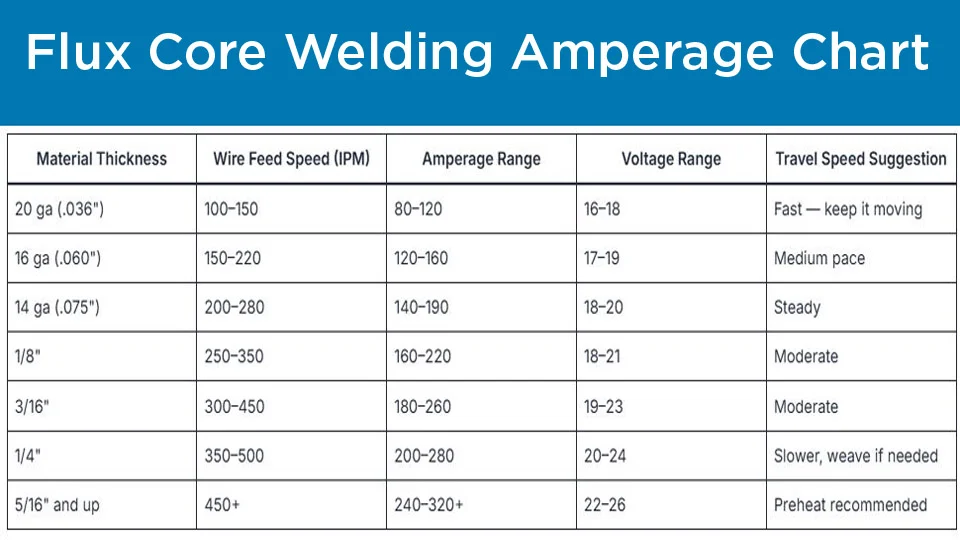
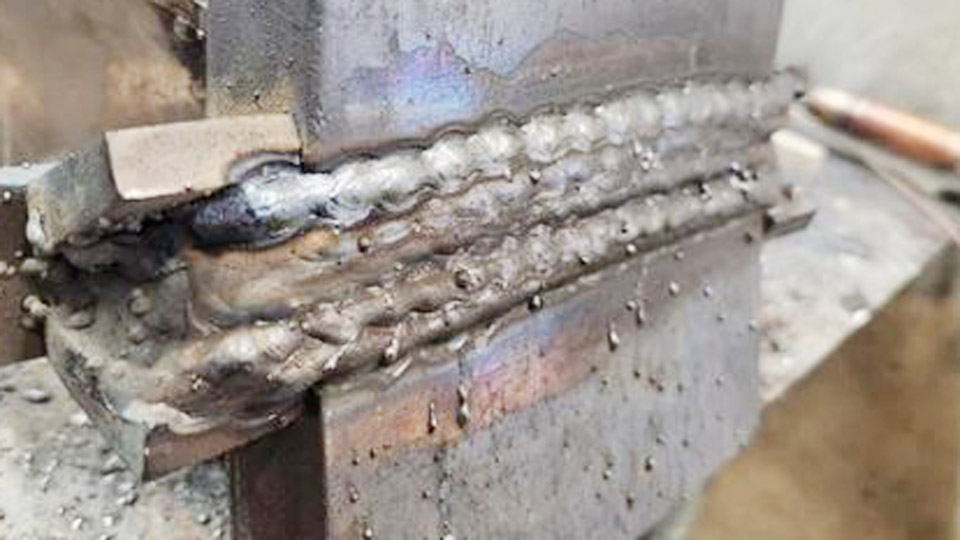
Image by garageweld
Understanding Amperage in Flux Core Welding
Amperage determines the amount of electrical current flowing through the arc, directly controlling heat input, melt-off rate, and penetration depth. In flux core welding, amperage is primarily set by wire feed speed (WFS) on most machines, with voltage fine-tuning arc length and bead shape.
How Amperage Interacts with Flux Core Variables
Flux core wires run hotter than solid MIG wires due to the flux’s contribution to the arc. Typical self-shielded wires use DCEN (electrode negative) polarity, concentrating heat at the workpiece for better penetration on thicker materials while reducing burn-through risk on thinner stock.
Key factors influencing required amperage:
- Material thickness: Roughly 1 amp per 0.001″ of thickness as a starting rule, though real-world adjustments are essential.
- Wire diameter: Larger diameters (e.g., 0.045″) handle higher amperage and deposition rates.
- Joint type and position: Butt joints in flat position need standard settings; vertical or overhead often requires 10-20% lower amperage/WFS to control the puddle.
- Travel speed: Faster travel reduces effective heat input, requiring higher amperage compensation.
Why a Dedicated Amperage Chart Matters
Generic machine dials rarely match actual output. Charts from manufacturers like Miller, Lincoln, or Hobart provide baselines that experienced welders tweak based on machine calibration, wire brand, and environmental conditions. Incorrect amperage leads to porosity, undercut, or slag inclusions—common failures in structural or repair work.
Flux Core Welding Amperage Chart by Wire Size and Thickness
Use these tables as starting points. Always test on scrap of identical material and thickness. Values assume DCEN polarity, standard stickout (3/4″ for self-shielded), and clean metal. Amperage is approximate and derived from WFS.
.030″ Flux Core Wire (Ideal for Thin Materials)
| Thickness | Voltage (V) | Wire Speed (IPM) | Amperage Range (A) | Typical Use |
|---|---|---|---|---|
| 18-14 ga (~0.040-0.075″) | 15-18 | 150-250 | 80-130 | Auto body, sheet metal |
| 1/16″ (0.0625″) | 16-19 | 180-280 | 90-140 | Light fabrication |
| 1/8″ (0.125″) | 17-20 | 240-320 | 120-170 | General repairs |
.035″ Flux Core Wire (Most Versatile for General Work)
| Thickness | Voltage (V) | Wire Speed (IPM) | Amperage Range (A) | Typical Use |
|---|---|---|---|---|
| 1/8″ | 17-20 | 240-340 | 130-190 | Frames, brackets |
| 3/16″ | 18-22 | 280-380 | 160-220 | Structural repairs |
| 1/4″ | 19-24 | 320-450 | 180-250 | Heavy fab, trailer hitches |
.045″ Flux Core Wire (For Thicker Plate)
| Thickness | Voltage (V) | Wire Speed (IPM) | Amperage Range (A) | Typical Use |
|---|---|---|---|---|
| 1/4″ | 20-25 | 200-350 | 180-260 | Base plates, machinery |
| 3/8″ | 22-27 | 180-320 | 200-300 | Heavy structural |
| 1/2″+ | 24-30 | 150-280 | 220-350+ | Multi-pass on plate |
Note: Higher amperage ranges suit flat/horizontal positions. Reduce by 15-25A for vertical-up to prevent puddle runoff.
Selecting Wire Diameter Based on Amperage and Application
Matching Wire to Machine Output and Job Demands
Smaller .030″ wire excels at lower amperage (under 150A), minimizing burn-through on sheet metal while maintaining good deposition. It pairs well with 120V machines limited to ~140A output.
.035″ strikes the best balance for most users, handling 120-250A effectively across common thicknesses. It offers solid penetration without excessive spatter when settings are dialed.
Larger .045″ or .052″ wires demand machines capable of 200A+, delivering high deposition rates ideal for filling grooves or building up thick sections quickly. They run hotter, requiring careful heat management to avoid distortion.
Impact of Wire Type: Self-Shielded vs. Gas-Shielded
Self-shielded (FCAW-S) wires like E71T-11 or NR-211-MP tolerate wind and dirty metal but produce more slag and spatter. Gas-shielded (FCAW-G) often run DCEP and allow slightly lower amperage for equivalent penetration due to more efficient shielding.
Adjusting Amperage for Welding Positions and Joints
Flat and Horizontal Positions
Standard chart values work best here. Focus on steady travel speed (8-12 IPM typical) to achieve consistent bead width and penetration. Higher amperage supports faster travel on thicker material.
Vertical and Overhead Welding
Drop amperage/WFS by 10-20% and shorten stickout to 1/2-5/8″. Use a slight weave or whipping technique to control the molten pool. Vertical-up requires more skill to avoid undercut at the toes—maintain a tight arc and watch for proper tie-in.
T-Joints, Lap Joints, and Fillets
Fillets often need 10-15% higher amperage than butt joints of the same thickness for equal leg sizes. Ensure the gun angle directs the arc into the joint root for full fusion.
Machine-Specific Considerations and Calibration
Many consumer flux core machines lack precise digital readouts. Rely on sound (steady bacon sizzle) and bead appearance more than exact numbers. Test welds on scrap and measure penetration by sectioning or bending.
Voltage primarily controls arc length: too high creates a long, unstable arc with spatter; too low causes stubbing. Fine-tune voltage after setting WFS to achieve desired amperage/heat.
Real-World Factors Affecting Amperage Requirements
- Material condition: Rusty or painted surfaces may need slightly higher amperage or pre-cleaning.
- Temperature: Cold base metal (below 50°F) benefits from preheat (200-300°F) to maintain effective heat input without raising machine settings excessively.
- Multi-pass welding: Root pass at lower amperage for penetration; fill and cap passes can use higher settings for buildup.
- Power source limitations: 120V machines max out around 130-150A effectively; 240V units deliver more consistent output for thicker work.
Common Amperage-Related Problems and Fixes
Porosity or worm tracks often stem from amperage too low for the travel speed, failing to burn off contaminants. Increase WFS/amperage or slow travel.
Excessive spatter and convex beads indicate amperage/voltage mismatch—typically too much wire for the voltage. Reduce WFS or increase voltage slightly.
Lack of fusion or shallow penetration calls for higher amperage, slower travel, or better joint preparation (beveling edges on thicker stock).
Advanced Techniques Using Amperage Charts
For pro-level results on critical welds, calculate approximate heat input: (Amps × Volts × 60) / Travel Speed (IPM). Target 20-40 kJ/in for mild steel depending on application.
In multi-pass scenarios, alternate bead placement to balance heat and minimize distortion. Experienced welders log successful settings (wire type, thickness, position, final amperage) for repeatability on future jobs.
Wrapping Up
Mastering your flux core welding amperage chart transforms variable results into predictable, high-quality welds. The right amperage delivers optimal penetration, minimal distortion, and strong mechanical properties across projects—from hobby repairs to professional fabrication.
True expertise comes from treating every chart as a baseline, then calibrating to your specific machine, wire lot, and real-world conditions through deliberate test welds. Consistent documentation of what works builds an invaluable personal reference that outperforms any generic table. This approach separates adequate welds from welds that endure.
FAQ
What amperage is best for 1/4″ steel with .035″ flux core wire?
Aim for 180-220A (typically 19-24V at 300-400 IPM). This provides good penetration in a single pass for flat position. Test and adjust for your machine.
Does flux core welding require different amperage than solid MIG wire?
Yes. Flux core generally runs at similar or slightly higher effective heat but uses DCEN polarity and produces a hotter arc overall. Charts specific to flux core are essential—do not use solid wire MIG settings.
How do I know if my amperage is too high or too low without a meter?
Listen to the arc and inspect the bead. Too high: loud crackling, excessive spatter, burn-through. Too low: stuttering arc, poor fusion, ropey bead. A steady sizzle with flat-to-slightly convex bead indicates good settings.
Can I weld thicker than 1/4″ effectively with a 140A flux core machine?
Single-pass capability drops off sharply above 1/4″. Use multi-pass techniques with proper joint preparation, or upgrade to a higher-output machine for efficiency on heavier material.