Safety chains are a critical backup connection between a trailer and tow vehicle, and their weld quality directly affects road safety, regulatory compliance, and liability.
Understanding how to weld safety chains on a trailer is more than attaching hardware to a frame—it requires selecting the correct chain attachment method, achieving adequate weld penetration, and avoiding heat-related damage that can weaken the chain or mounting point.
Improper welding can lead to attachment failure under load, failed inspections, costly repairs, or dangerous trailer separation during towing. Factors such as trailer frame material, chain grade, weld location, and process selection all influence the strength and reliability of the finished connection.
A properly executed weld creates a durable attachment that can withstand vibration, shock loading, and long-term service conditions. The following guidance focuses on the practical welding considerations, safety requirements, and fabrication techniques needed to produce a secure and dependable safety chain installation.
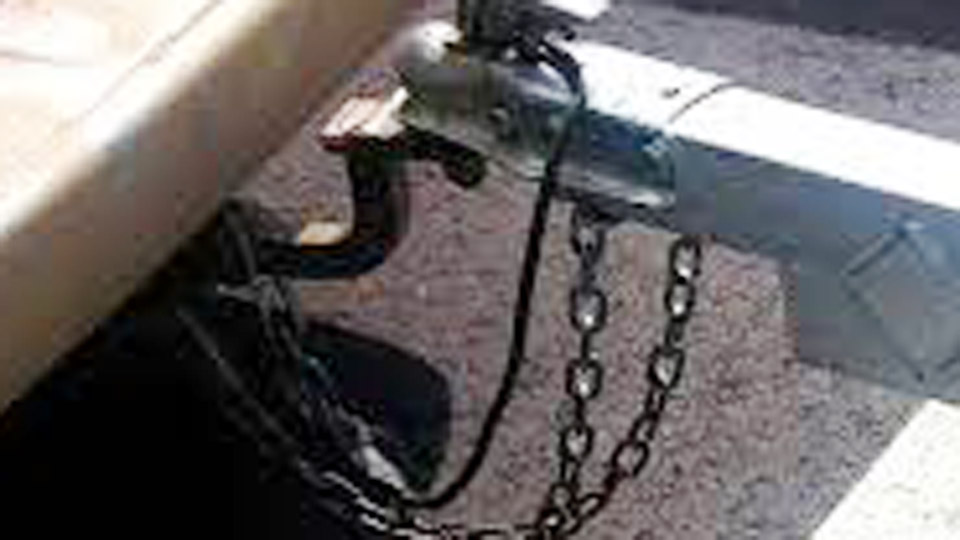
Image by mechanicalelements
Why Proper Welding Matters for Trailer Safety Chains
Safety chains serve as the secondary connection if the primary coupler disconnects. Regulations require their combined strength to meet or exceed the trailer’s Gross Vehicle Weight Rating (GVWR), with two independent chains attached to structural points on the tongue or A-frame.
Direct welding to chain links anneals and weakens the heat-treated material, reducing breaking strength significantly. Instead, focus on welding robust retainers, brackets, or loops that keep the chain links intact while providing secure, free-moving attachment.
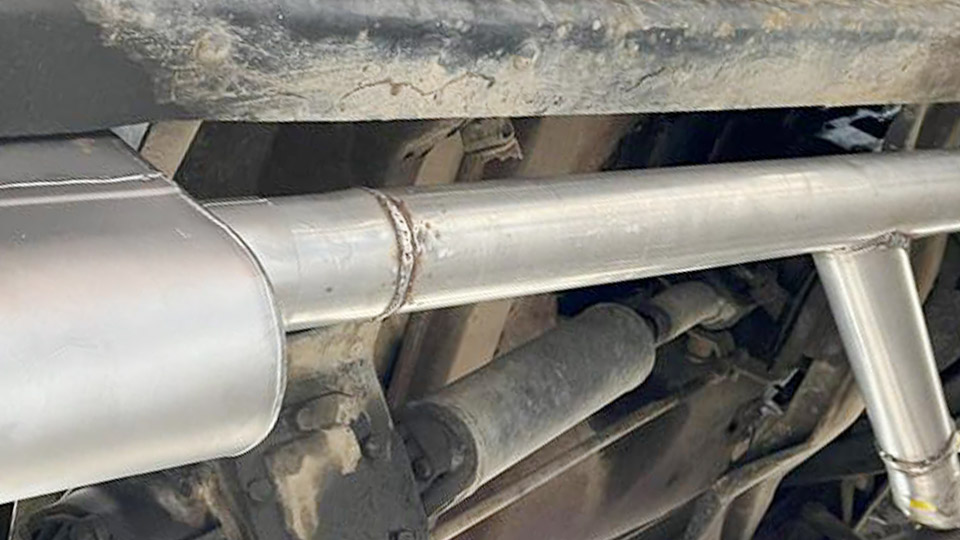
Common trailer tongue materials—typically 1/8″ to 1/4″ wall mild steel rectangular or square tubing (e.g., 2×3″ or 3×4″)—demand welds that achieve full penetration without burn-through or distortion. Incorrect processes or parameters lead to cold laps, lack of fusion, or stress risers that fail under dynamic loads from braking, turning, or road impacts.
Understanding Trailer Safety Chain Requirements and Standards
GVWR-Based Chain Selection and Class Ratings
Match chains to your trailer’s GVWR class per SAE J684 guidelines, which cover most trailers up to 10,000 lbs:
- Class 1 (up to 2,000 lbs GVWR): Lighter chains, often 1/4″ Grade 30 or 43.
- Class 2-3 (3,000–5,000 lbs): 5/16″ Grade 43 or 70 common.
- Class 4 (up to 7,600+ lbs): 3/8″ or larger Grade 70 for higher working load limits (WLL) and minimum breaking strengths (often 3x WLL).
Each individual chain and its attachment should contribute to the total strength equaling or exceeding GVWR. Grade 70 transport chain offers excellent strength-to-weight for most applications, with WLL around 4,700–6,600 lbs depending on diameter. Always verify stamped ratings and avoid mixing grades.
Attachment Location and Geometry Decisions
Mount chains equidistant from the centerline on the trailer tongue or A-frame, forward of the coupler but on structural tubing. Position retainers so chains cross under the tongue when connected to the tow vehicle, creating a cradle that supports the coupler if it drops. This prevents the tongue from dragging on the road.
Optimal placement keeps chains clear of suspension, wiring, and jack mechanisms while allowing full articulation. For A-frame trailers, weld to the lower horizontal surfaces or reinforced plates for maximum weld area and load distribution.
Legal and Regulatory Considerations
Federal and state rules (e.g., 49 CFR 393.70) prohibit welding operations on the chain itself post-manufacture. Attachments must use bolts, pins, or welded retainers that preserve chain integrity.
Slack should permit turning but prevent ground contact. Many states mandate crossed chains and periodic inspections for wear, elongation, or damaged links.
Choosing the Right Welding Process and Equipment
MIG vs. Flux-Core vs. Stick for Trailer Mounts
For trailer tongue work on mild steel:
Gas MIG (75/25 Ar/CO2): Cleanest, best control on 1/8″–1/4″ material. Excellent for cosmetic and structural fillet welds on visible mounts.
Flux-Core (Self-Shielded): Ideal for outdoor or windy conditions; good penetration on dirty or thicker stock but produces more spatter and slag.
Stick (SMAW with 7018): Superior for heavier sections or when maximum strength is needed; low-hydrogen rods minimize cracking in critical loads.
Many fabricators prefer 7018 for final passes on high-stress retainers due to its toughness.
Recommended Machine Settings and Parameters
For .035″ flux-core or solid wire on 3/16″–1/4″ tongue material (common thicknesses):
- Voltage: 18–22V
- Wire Feed Speed: 200–350 IPM
- Amperage: 140–220A (scale with thickness; ~1A per 0.001″ as a rule of thumb)
- Travel speed: Maintain a consistent puddle without stacking too much heat.
Use short-circuit or globular transfer for thinner tongues to avoid burn-through. For thicker brackets, spray transfer with higher settings improves fusion. Always test settings on scrap matching your tongue material and thickness.
Pre-heat thicker sections lightly if ambient temperatures are low, and maintain interpass temperatures below 300°F to prevent distortion.
Designing and Fabricating Weld-On Retainers and Mounts
Types of Weld-On Attachments
Avoid welding chain links directly. Preferred options include:
Forged Weld-On Clevis Retainers: Commercial 3/8″ or 1/2″ units rated for high MBS (e.g., 25,000+ lbs). These provide a pin or loop for the end link.
Custom Bent Rod Loops: Use 3/8″–1/2″ round rod (mild or high-strength steel) formed into a U-shape or eye. Thread the chain end link onto the rod before welding the legs to the tongue.
Plate Brackets or Tabs: Cut 1/4″–3/8″ plate into reinforced tabs with holes for clevis pins or quick links. Weld tabs perpendicular or parallel to the tongue for optimal load paths.
Position the retainer so the chain hangs freely and can articulate in all directions.
Material Prep and Joint Design
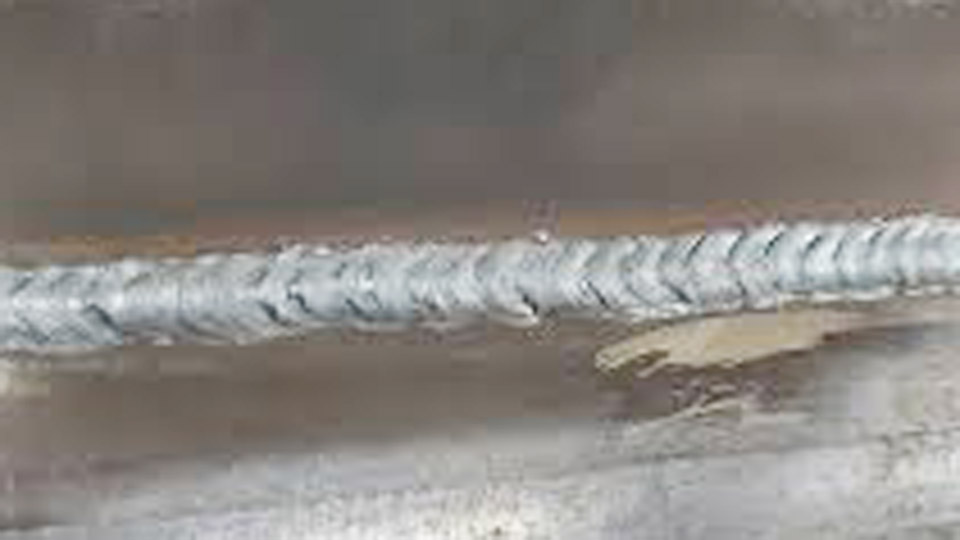
Grind or wire-brush all surfaces to bright metal, removing mill scale, rust, paint, and galvanization. Bevel edges slightly for better penetration on thicker joints. Use lap or T-joints with generous fillet sizes—aim for leg lengths at least equal to the thinner material thickness (e.g., 1/4″ fillets on 1/4″ stock).
For rod loops, ensure the weld contact area is maximized by flaring or notching the rod ends.
Step-by-Step Welding Process for Safety Chain Mounts
Layout and Fit-Up: Mark symmetric positions on the tongue. Tack the retainer in place with small welds, check alignment and chain fit with full articulation.
Root Pass: Use stringer beads or slight weave for initial fusion. Focus on deep penetration into the tongue tubing without excessive melt-through.
Fill and Cap Passes: Build multi-pass fillets. For high-strength, alternate directions or use back-stepping to control heat input and reduce distortion. Start and stop away from high-stress areas.
Post-Weld Treatment: Clean slag, inspect for cracks or undercut. Grind smooth if needed, but avoid reducing throat thickness. Apply corrosion protection (paint or galvanizing primer) over welds.
Inspect visually and with dye penetrant if possible. Test by loading the chain to a percentage of rated strength before road use.
Advanced Techniques for Maximum Strength and Durability
Multi-Pass Welding Strategies
On critical mounts, use a root pass with E6010 or flux-core for penetration, followed by 7018 caps for ductility and crack resistance. This hybrid approach balances penetration with toughness. Control heat input (around 20–40 kJ/in) to prevent HAZ weakening in the tongue.
Reinforcement Options
Add gussets or backing plates inside the tongue tubing where accessible for distributing shear and tensile loads. For very high GVWR trailers, consider boxing the tongue section around the mount area.
Corrosion and Fatigue Resistance
Trailer environments expose welds to road salt, moisture, and vibration. Use low-hydrogen processes and post-weld coatings. Periodically inspect for fatigue cracks starting at weld toes—common failure points under cyclic loading.
Common Welding Challenges and Technical Solutions
Distortion on Thin Tongue Tubing
Clamp or brace the A-frame during welding. Weld symmetrically on both sides, using smaller passes and allowing cooling between them. Back-step technique helps.
Welding to Galvanized or Coated Frames
Burn off coating first in the weld zone or use specific wires designed for dirty metal. Ventilate properly due to fumes.
Ensuring Code Compliance in Welds
Welds must not be the weak link. The attachment’s strength should match or exceed the chain’s. Professional certification (e.g., AWS D1.1 structural) provides assurance for commercial trailers, though not always required for personal use.
Tools and Consumables for Trailer Chain Welding
- Angle grinder with flap discs and grinding wheels.
- Clamps, magnets, and levels for fit-up.
- Appropriate wire/rod: .035″ flux-core or ER70S-6 solid; 1/8″ 7018 stick.
- Safety gear: Auto-darkening helmet, leather, ventilation.
Real-World Performance Insights
In testing and field use, properly welded clevis retainers outperform direct attachments by preserving full chain strength and allowing movement that reduces fatigue. Crossed chains with adequate but minimal slack perform best in separation scenarios, cradling the tongue effectively.
For removable tongues or modular setups, design dual attachment points to maintain continuous safety.
Performance Takeaway
Prioritize symmetric, multi-pass fillet welds on forged or heavy-plate retainers matched to your GVWR and tongue material. This ensures the safety system exceeds regulatory minimums and withstands repeated dynamic stresses.
An advanced insight: Treat the entire attachment as a system—chain, retainer, weld, and tongue—where optimizing weld geometry (concave fillets with smooth transitions) and using high-toughness filler can dramatically improve fatigue life under the vibrational loads typical of trailer towing.
FAQ
Can I weld safety chains directly to the trailer frame?
No. Welding heat weakens the chain links. Use weld-on retainers, clevis hooks, or rod loops instead to keep the chain intact.
What size chain and welds for a 5,000 lb GVWR trailer?
Typically 5/16″ Grade 70 chain. Use 1/4″ or larger fillet welds on appropriately rated retainers, ensuring total system strength meets or exceeds GVWR.
Is MIG or stick better for welding trailer safety chain mounts?
Both work well with proper settings; 7018 stick often provides superior toughness for critical structural attachments, while MIG offers speed and cleanliness on production-style work.
How do I know if my welded mounts are strong enough?
Match ratings to GVWR, use full-penetration techniques, inspect for defects, and consider professional load testing for high-stakes applications.