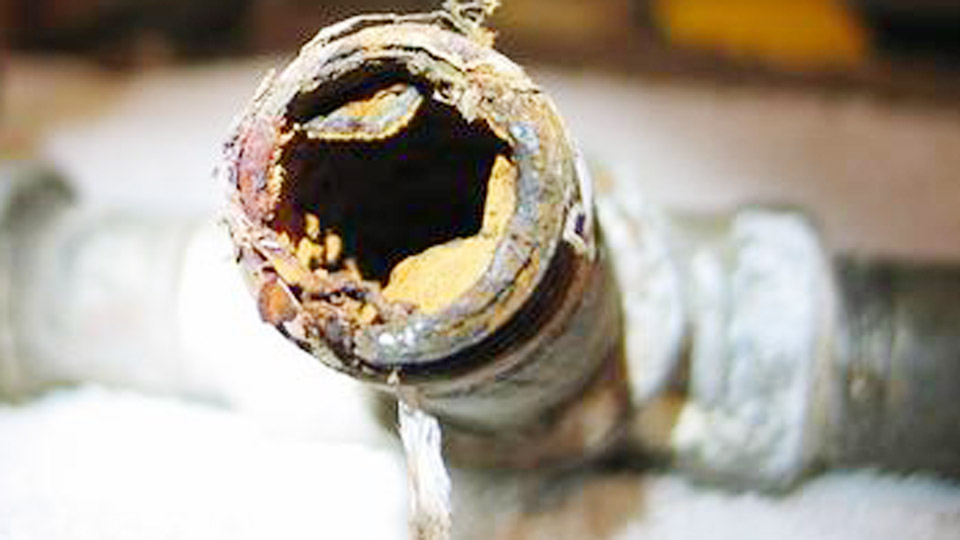
Rusted metal with holes presents one of the most common yet frustrating challenges in welding and fabrication. Whether on vehicle frames, equipment panels, structural supports, or DIY projects, rust penetrates deeply, creating perforations that compromise integrity, allow further corrosion, and demand precise intervention.
Learning how to repair rusted metal with holes requires more than slapping on a patch—it involves accurate assessment of damage extent, thorough surface preparation, selection of the right welding process, and controlled application to restore strength without introducing distortion or weak points.
This process matters because improper repairs fail prematurely under load, vibration, or environmental exposure, leading to safety risks and costly rework. Effective repairs extend service life, maintain structural performance, and deliver professional results for hobbyists and pros alike.
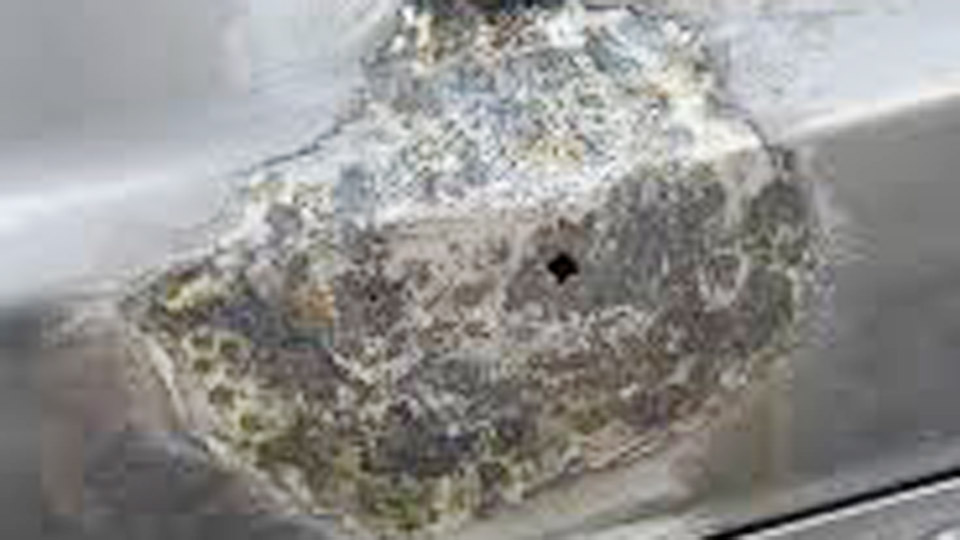
Image by Automotive Paint, Body Work And Tips
Assessing Rust Damage and Deciding Repair vs. Replacement
Determining the Extent of Corrosion
Begin by probing the area with a sharp tool or wire to map hidden rust pockets. Rust often spreads laterally beneath paint or coatings, weakening surrounding metal far beyond visible holes.
Measure remaining thickness with a caliper or ultrasonic gauge if available—metal below 1/16 inch (about 1.6 mm) on sheet typically requires cutting out rather than filling.
Inspect both sides of the panel. Structural components like frames or chassis rails need particular scrutiny: perforations here often indicate replacement over repair for load-bearing safety.
When to Cut Out vs. Patch In Place
For isolated pinholes (under 1/4 inch) in non-structural thin sheet (18-22 gauge), direct filling or small plugs may suffice. Larger holes or widespread pitting demand cutting back to solid metal, typically 1-2 inches beyond visible rust, to ensure sound weld zones.
Replacement becomes preferable when over 30-40% of a panel shows thinning or when access for proper backing and finishing is limited.
Factor in material availability, time, and end-use: cosmetic auto body tolerates more filler, while pressure vessels or heavy equipment demand full structural restoration.
Material Compatibility Considerations
Match base metal type and thickness—mild steel to mild steel, galvanized where original coating existed. Use 16-20 gauge patch material for automotive sheet to match stiffness. For stainless or aluminum applications, contamination risks increase dramatically, requiring dedicated tools.
Surface Preparation for Successful Welds
Mechanical Rust Removal Techniques
Grind or sandblast to bare, bright metal extending 1-2 inches around the repair zone. Flap discs (40-80 grit) or stripping wheels remove rust without excessive thinning. Wire wheels work for light surface scale but risk embedding particles.
Avoid over-grinding thin panels, which reduces thickness further. Vacuum or blow away debris immediately to prevent re-contamination.
Chemical Treatments and Inhibitors
Apply rust converters or evaporative solvents after mechanical cleaning. For weld-through scenarios, use primers rated for high heat. Ensure surfaces are completely dry and oil-free—brake cleaner or acetone final wipe is standard. Residual contaminants cause porosity, inclusions, or poor fusion.
Edge Preparation and Fit-Up
Bevel or flange edges for better penetration on thicker sections. For patches, create tight butt joints or controlled overlaps. Use temporary backing like copper bars or aluminum to prevent burn-through and aid heat sinking during welding.
Choosing the Right Welding Process
MIG Welding for Rust Repairs
MIG (GMAW) is the go-to for most repairs due to speed and versatility. Use .023″ or .030″ solid wire with 75/25 Ar/CO2 shielding gas for thin sheet. Flux-cored wire handles dirtier conditions better but produces more spatter and slag.
Typical settings for 18-20 gauge steel: voltage 15-19V, wire speed adjusted for short-circuit transfer (around 100-200 ipm depending on machine). Short bursts or stitch welding minimize heat input and distortion. Push technique with 10-15° angle helps.
TIG Welding Advantages on Thin or Critical Repairs
TIG (GTAW) excels for precision on thin metal, producing clean, low-distortion welds easier to planish. Use 1/16″ tungsten, 50-90 amps DCEN for sheet, and ER70S-2 or similar filler. Pulse settings (e.g., 1-2 Hz) control heat effectively.
TIG requires cleaner surfaces but allows superior control filling small holes by “laying rod” or building puddles gradually.
Stick Welding Limitations and Uses
SMAW works on heavier, dirtier rust but struggles with thin sheet due to high heat and slag. Useful for field repairs on thicker structural members with 6011 or 7018 electrodes.
Step-by-Step: Repairing Small to Medium Holes
For holes up to 1 inch, direct filling or plug methods apply after preparation.
- Cut or grind the hole to clean, regular edges.
- Position copper or aluminum backing behind the hole.
- Tack around edges or build spiral fills with MIG/TIG, allowing cooling between passes.
- For MIG on pinholes, use short bursts feeding additional wire if needed.
- Grind flush, checking for penetration and defects with dye penetrant if critical.
Larger holes require fabricated patches.
Fabricating and Installing Patch Panels
Pattern Making and Cutting
Create cardboard or paper templates for exact fit. Transfer to new sheet metal, adding overlap or flange as needed. Use plasma, shear, or cutoff wheel for clean cuts. Flange edges with a hammer and dolly or dedicated tool for recessed fit.
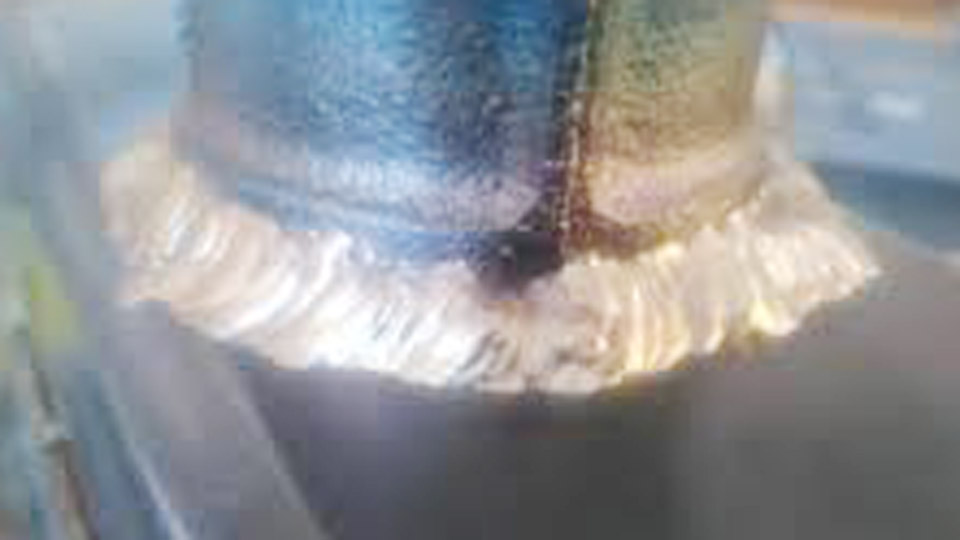
Welding Techniques for Patches
Butt welds preferred for flush finish; lap welds easier for beginners. Tack every 1-2 inches, alternating sides to balance heat. Weld in short segments (1-2 inches), cooling with compressed air or water (back side) to control warpage.
For MIG: maintain short stickout (1/4-1/2″), steady travel. For TIG: focus on puddle control and filler addition without overheating.
Monitor for undercut, porosity, or lack of fusion—grind and reweld as needed.
Post-Weld Finishing and Corrosion Protection
Grind welds progressively (36-80-120 grit) then use body filler or metal finishing techniques for smooth contours. Hammer and dolly while warm to relieve stress.
Apply weld-through primer before painting if applicable, followed by epoxy primer and topcoat. Seam seal all joints. For maximum longevity, consider undercoating or cavity wax in enclosed areas.
Advanced Considerations for Structural and Heavy-Duty Repairs
On frames or load-bearing parts, full section replacement with proper splice techniques (fish plates, plug welds) ensures strength. Heat input control and post-weld heat treatment may apply for high-strength steels.
Test repairs under simulated loads. For galvanized material, remove coating in weld zones and restore protection afterward.
Common Process-Specific Challenges and Solutions
Managing Distortion in Thin Sheet
Alternate weld locations, use skip welding, clamp securely, and employ heat sinks. Back-stepping (welding toward the start of previous segment) helps.
Welding Through Residual Rust or Contaminants
Flux-cored MIG tolerates more, but results suffer. Best practice remains full cleaning. If limited, increase voltage slightly and use digging electrodes for stick.
Hole Filling Without Patches
For small perforations, copper backing + layered MIG or TIG deposits works well. Avoid excessive buildup that requires heavy grinding.
Equipment and Consumables Recommendations
- MIG: 110/220V machine capable of low settings, .023″ wire, C25 gas.
- TIG: AC/DC with pulse, foot pedal for heat control.
- Accessories: angle grinder, flanging tools, backing bars, calipers, dye penetrant kit.
Decision-Making Summary for Long-Term Success
Selecting the optimal repair for rusted metal with holes hinges on accurate damage mapping, process choice matched to material and access, and disciplined heat management.
MIG offers efficiency for general work, while TIG delivers superior control and finish on precision applications. Always prioritize cutting to sound metal over cosmetic fixes—strong, protected welds outperform filled rust every time.
A pro-level insight: the highest-performing repairs treat the weld zone as a engineered transition, balancing metallurgy, residual stresses, and environmental barriers. Master controlled, low-heat techniques and post-repair protection, and your fixes will outlast the surrounding original metal.
FAQ
Can you weld over rust without full cleaning?
Limited success is possible with flux-cored MIG or certain stick electrodes on light surface rust, but penetration and strength suffer significantly. Full mechanical and chemical cleaning to bright metal remains the reliable standard for durable repairs.
What’s the best welder for repairing rust holes in car panels?
MIG with .023″ wire and shielding gas excels for most auto body work due to speed and control. TIG provides better results on very thin or distortion-sensitive areas but requires more skill.
How do I prevent new rust after repairing holes?
Grind welds smooth, apply epoxy primer immediately, use seam sealer, and topcoat with quality paint. Cavity wax or undercoating protects hidden surfaces effectively.
Should I use body filler or weld everything?
Weld structural integrity first, then minimal filler for cosmetics. Over-reliance on filler masks poor welds and fails over time. Proper welding plus thin filler layers yields professional, lasting results.