Stainless steel TIG welding often leads to frustration with warping, sugaring, or lack of fusion when amperage is off. Many welders guess settings based on mild steel rules, resulting in burned thin sheets or cold laps on thicker material.
A reliable TIG amp chart for stainless steel delivers starting points that account for its lower thermal conductivity and sensitivity to heat input.
Proper amperage ensures strong, corrosion-resistant welds with clean appearance across DIY projects, repairs, or professional fabrication.
Why Stainless Steel Needs Specific Amperage Control
Stainless steel retains heat longer than carbon steel because of lower thermal conductivity. This means you generally use about 10-20% lower amperage than for mild steel of the same thickness, or roughly 0.7-0.8 amps per 0.001″ (one thousandth of an inch) instead of 1 amp.
Over-amperage causes distortion, oxidation (sugaring), and loss of corrosion resistance. Under-amperage leads to poor fusion and weak joints. Accurate settings, combined with travel speed and gas shielding, maintain the material’s properties.
Base TIG Amp Chart for Stainless Steel by Thickness
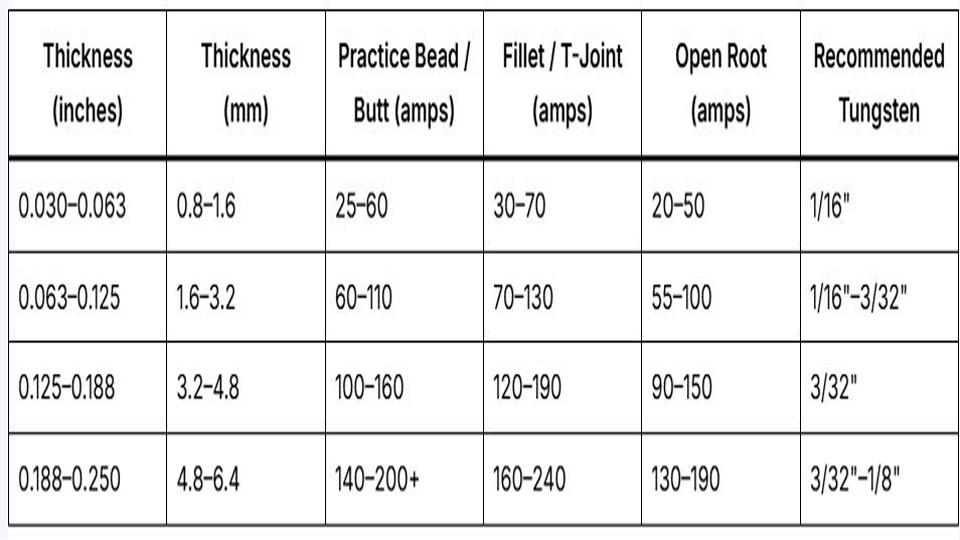
Use these ranges as starting points for DCEN (Direct Current Electrode Negative) TIG welding with argon shielding. Adjust with a foot pedal for real-time control. Values assume butt or fillet joints on 304/316 grades.
Imperial Thickness Chart (Approximate Amperage Ranges):
- 0.020″ (24 ga): 15-25 A
- 0.030″ (22 ga): 20-35 A
- 0.040″ (20 ga): 25-40 A
- 1/16″ (0.0625″, 16 ga): 40-60 A
- 0.090″-0.100″: 60-80 A
- 1/8″ (0.125″): 80-110 A
- 3/16″ (0.187″): 120-160 A
- 1/4″ (0.250″): 160-220 A (often multi-pass)
Metric Equivalents (mm thickness):
- 0.8 mm: 20-30 A
- 1.0 mm: 25-40 A
- 1.5 mm: 40-55 A
- 2.0 mm: 55-75 A
- 3.0 mm: 80-110 A
These align with common industry references, where stainless requires less heat than mild steel. Beginners should start at the lower end and increase as travel speed improves.
Factors That Adjust Amperage Settings
Material Grade and Joint Type
304 and 304L tolerate standard settings well. 316/316L may need slight increases (5-10 A) for better fluidity due to molybdenum content. For butt joints, use the base chart. Fillets often require 10-20% more amperage for the same thickness because of greater heat sink effect from two sides.
Open-root pipe welds demand precise control—start 10-15 A lower and focus on fusion. Dissimilar thickness joints follow the thinner piece.
Tungsten Electrode Selection and Preparation
Match tungsten diameter to amperage:
- 1/16″ (1.6 mm): Up to ~150 A (ideal for thin work)
- 3/32″ (2.4 mm): 100-250 A (versatile)
- 1/8″ (3.2 mm): Above 200 A
Use 2% lanthanated or ceriated for DC TIG on stainless. Grind longitudinally with a fine diamond wheel to a sharp point (15-30° taper). Blunt the tip slightly for higher amps to prevent erosion. A dull or contaminated point forces higher amperage and destabilizes the arc.
Filler Rod Diameter and Technique
- Thin material (<1/16″): 1/16″ or smaller rod, or autogenous (no filler).
- 1/16″-1/8″: 1/16″-3/32″ rod.
- Thicker: 3/32″-1/8″ rod.
Larger filler cools the puddle, sometimes requiring +5 A. Add filler steadily to avoid cold laps. Dip technique works better than continuous feed for control on stainless.
Voltage, Travel Speed, and Gas Flow Integration
Voltage in TIG is relatively stable (10-14 V for thin stainless, 14-18 V for thicker). Focus on amperage and speed instead. Travel speed directly affects heat input: faster speeds allow slightly higher amps without overheating. Aim for 4-12 inches per minute depending on thickness—watch the puddle width (about 1.5-2x tungsten diameter is ideal).
Shielding Gas: Pure argon at 15-20 CFH for most cups (#7-#10). Use larger cups or argon/helium mixes for thicker sections to improve penetration and reduce oxidation.
Post-flow 10-15+ seconds (or longer on hot material) is non-negotiable for stainless to prevent sugaring. Keep the torch in place until the bead cools below visible red.
Pulse TIG Settings for Stainless Steel
Pulse welding excels on stainless by reducing overall heat input, minimizing distortion, and improving control on thin material or out-of-position welds.
Basic Pulse Recommendations:
- Peak Amps: Your normal setting (e.g., 60-80 A for 16 ga).
- Background Amps: 20-40% of peak (low enough to allow cooling).
- Pulses Per Second (PPS): 1-2 PPS for manual control and puddle management; 30-100+ PPS for stiffer arc and faster travel on production.
- Pulse Width/Duty Cycle: 30-50% (time at peak).
For thin autogenous corner welds, try 1 PPS with very low background (~5-10%). Higher frequencies tighten the arc for better directional control. Test on scrap—pulse helps achieve beautiful stacked dimes with less risk of burn-through.
Amperage for Specific Applications
Thin Sheet and Bodywork
For 0.040″-0.060″ stainless (common in exhaust, tanks, or panels), 30-55 A prevents warping. Use pulse, backing bars, or copper chill blocks. Tack frequently with low amps and skip-weld to distribute heat. Autogenous welding works if fit-up is perfect; otherwise, use thin filler.
Pipe and Tubing
Root passes on stainless pipe (e.g., schedule 10 1/8″ wall) often use 50-90 A depending on diameter. Maintain tight arc and consistent travel. Fill and cap with slightly higher settings or multi-pass. Purge the back side with argon to prevent oxidation inside the pipe.
Thicker Sections and Multi-Pass
Above 3/16″, plan multiple passes. Root: lower amps for penetration without melt-through.
Filler passes: increase 10-20 A for good tie-in. Cap: match or slightly higher for profile. Interpass temperature control (keep below 350°F/175°C) preserves properties—use temp sticks.
Out-of-Position Welding
Vertical-up: Reduce amps 10-15% and use smaller puddle. Overhead: Further reduction plus faster travel. Pulse is highly advantageous here for puddle control.
Machine Setup and Advanced Considerations
Select DCEN polarity. High-frequency start for clean arc initiation without tungsten contamination. Slope-up/slope-down (if available) prevents craters.
Balance amperage with gas pre-flow (0.5-1 sec) and post-flow. For inverters, settings may run slightly lower than transformer machines due to efficiency.
Monitor heat input formula for critical work: (Amps × Volts × 60) / Travel Speed (IPM) in kJ/in. Lower input preserves corrosion resistance in 300-series stainless.
Real-World Decision Making
Start conservatively on scrap of the exact material and thickness. Run a bead, check penetration and appearance, then adjust. Pedal control lets you ramp up at starts (for fusion) and down at ends (to fill craters).
Consistent tungsten prep and clean base metal (remove oxides, oils) matter as much as amperage. Drafts destroy shielding—work in still air or use screens.
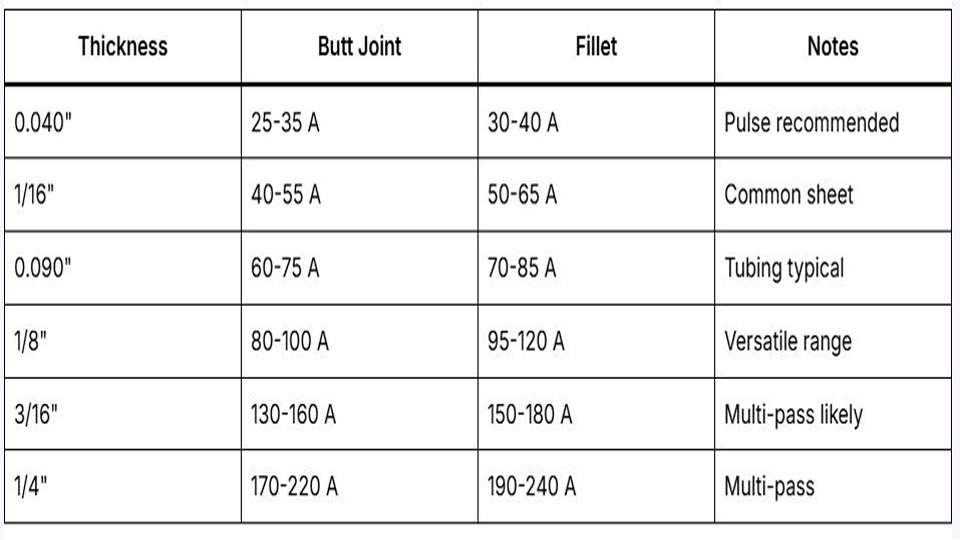
TIG Amp Chart for Stainless Steel Summary (Starting Points – DCEN, Argon):
| Thickness | Butt Joint | Fillet | Notes |
|---|---|---|---|
| 0.040″ | 25-35 A | 30-40 A | Pulse recommended |
| 1/16″ | 40-55 A | 50-65 A | Common sheet |
| 0.090″ | 60-75 A | 70-85 A | Tubing typical |
| 1/8″ | 80-100 A | 95-120 A | Versatile range |
| 3/16″ | 130-160 A | 150-180 A | Multi-pass likely |
| 1/4″ | 170-220 A | 190-240 A | Multi-pass |
Adjust ±10-20 A based on technique, fit-up, and position.
Final Thoughts
Mastering the TIG amp chart for stainless steel comes down to matching heat input to thickness, joint, and position while prioritizing shielding and travel speed. Consistent settings produce welds that maintain stainless properties—strong, corrosion-resistant, and visually clean.
Top professionals dial in exact parameters for the job, test rigorously, and adjust live with the pedal for results that outperform generic charts. Apply these values on your next project and refine through practice for pro-level outcomes.
FAQ
What is the rule of thumb for TIG amps on stainless steel?
Approximately 0.7-0.8 amps per 0.001″ of thickness (or 40 amps per mm as a metric guide). This is lower than mild steel’s 1 amp per thou because stainless holds heat longer. Always verify on test pieces.
How do I prevent sugaring when TIG welding stainless?
Use adequate post-flow (torch in place until cool), proper gas coverage (15-20 CFH), and avoid excessive heat. Back-purging pipe/tube is essential for internal protection.
Does 316 stainless need different amps than 304?
Slightly higher (5-10 A) due to different alloying, but follow the same thickness-based chart. Filler choice (ER316L for 316) matters more for corrosion performance.
Should I use pulse for all stainless TIG welds?
Not always, but it’s excellent for thin material, out-of-position, or distortion-prone work. Start without pulse to learn puddle control, then add it for refinement.