Soldering copper pipe to a brass fitting is a common plumbing task, but achieving a durable, leak-free joint depends on proper preparation, heat control, and solder application. Understanding how to solder copper pipe to brass fitting correctly is important because dissimilar metal connections can be vulnerable to weak bonding, incomplete solder flow, and premature joint failure if the surfaces are not cleaned and heated evenly.
In real-world installations, poor soldering practices can lead to leaks, costly repairs, water damage, and failed pressure tests. Factors such as fitting cleanliness, flux coverage, torch positioning, and temperature management all affect the quality and strength of the connection.
Whether you’re working on new plumbing lines or repairing existing systems, using the correct technique helps ensure long-term performance and code-compliant results.
The following guide explains the essential steps, tools, and best practices required to create a reliable soldered connection between copper pipe and brass fittings.
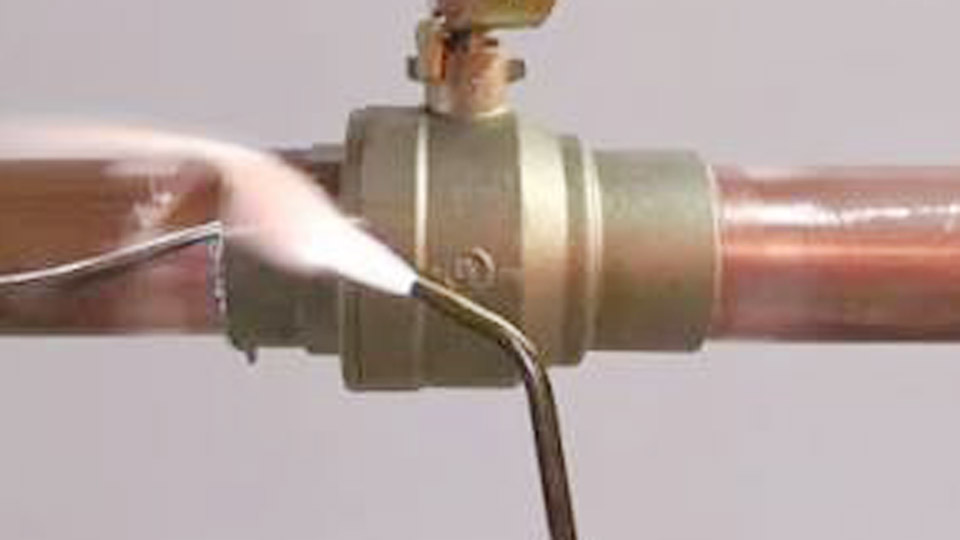
Image by achrnews
Material Compatibility and Joint Mechanics
Why Copper-to-Brass Joints Behave Differently
Copper expands and conducts heat rapidly, while brass—especially modern low-lead formulations—retains heat longer and has slightly different surface chemistry. This differential creates challenges for even heating and solder flow.
The joint relies on capillary action: molten solder drawn into the narrow gap (ideally 0.002–0.005 inches) by surface tension and flux cleaning.
Properly executed, these joints withstand pressures exceeding typical residential systems (up to 200+ PSI when cooled) and thermal cycling in hot water lines.
Solder and Flux Selection for Longevity
Use lead-free plumbing solder such as 95/5 tin-antimony or silver-bearing alloys (e.g., with 3–6% silver) for higher strength and better flow into brass. Standard 50/50 tin-lead is unsuitable for potable water.
Flux must actively remove oxides at soldering temperatures (around 400–500°F for soft solder). Water-soluble fluxes work for copper but often underperform on brass; opt for petroleum-based or tinning fluxes like Oatey No. 95 for brass fittings.
These provide better wetting and cleaning on slower-heating alloys. Stir flux thoroughly before use, as separation reduces effectiveness.
Comparison of Common Solder/Flux Pairs for Copper-Brass
| Application | Solder Type | Flux Recommendation | Melting Range | Best For |
|---|---|---|---|---|
| Potable Water | 95/5 Tin-Antimony | Tinning flux (No. 95) | ~450°F | Valves, elbows |
| High-Strength | Silver-bearing (4-6%) | Petroleum-based | 430–500°F | High-pressure or vibration |
| General Repair | Lead-free wire | Water-soluble (if clean) | ~440°F | Quick, low-volume |
Essential Tools and Setup
Torch and Heat Source Decisions
A standard propane torch suffices for pipes up to 3/4 inch, but switch to MAPP gas or acetylene for 1-inch and larger fittings or heavy brass valves. Brass requires more sustained heat input. Use a turbo-torch or similar with adjustable tips matched to joint size—small tip for precision, larger for even distribution on big fittings.
Position the workpiece so gravity assists solder flow where possible. For vertical joints, heat from the bottom and feed solder from the top.
Cleaning and Preparation Equipment
- Pipe cutter or hacksaw for square cuts
- Deburring tool or reamer
- Emery cloth (120–220 grit) or fitting brush
- Flux brush
- Heat shield or fire blanket for nearby surfaces
- Dry rags and isopropyl alcohol for final cleanup
Surface Preparation Techniques
Cutting and Deburring for Optimal Fit
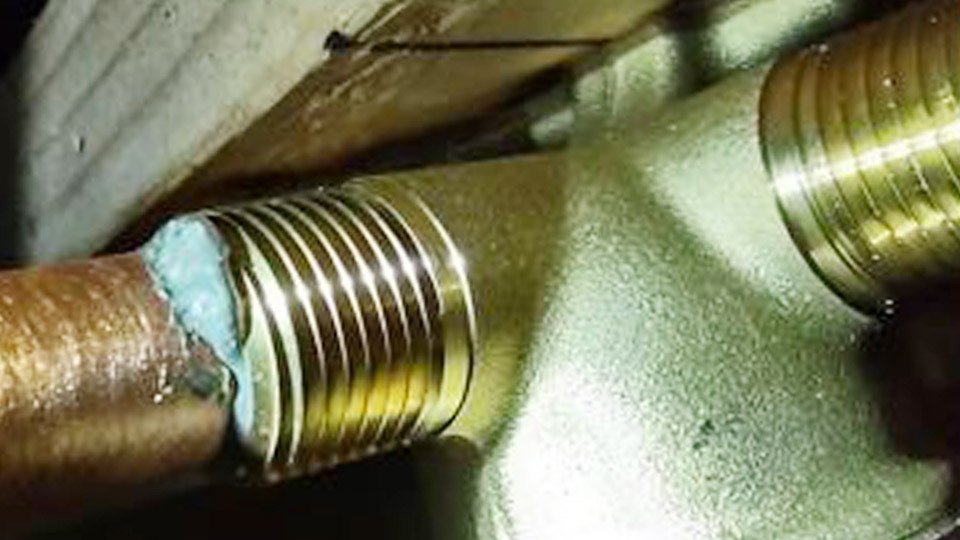
Cut copper pipe square using a tubing cutter to minimize distortion. Deburr inside and outside aggressively—burrs prevent full insertion and create turbulence or weak spots. For brass fittings, inspect internal threads or sockets for manufacturing residues; many imported fittings carry light oils or oxides.
Dry-fit the joint first. The pipe should slide in smoothly with slight resistance but no wobble. If tight, lightly sand the pipe end; avoid over-enlarging the fitting.
Abrasive Cleaning Protocols
Sand the copper pipe exterior 1–2 inches beyond the insertion depth until bright and shiny, removing all oxidation and markings. Clean the brass fitting interior with a dedicated wire brush or emery cloth wrapped around a dowel. Brass surfaces oxidize differently—focus on removing any dark tarnish without excessive material removal.
Wipe both with isopropyl alcohol or acetone after abrasion to eliminate dust and oils. Contaminants are the leading cause of solder beading instead of flowing.
Flux Application and Joint Assembly
Apply a thin, even layer of flux to the cleaned pipe end and fitting interior immediately before assembly. Excessive flux can trap gases and cause voids; too little fails to protect against re-oxidation. Assemble the joint while flux is wet, twisting slightly for even distribution. Wipe excess from the exterior to reduce post-solder cleanup.
For valves or complex fittings, ensure the valve is fully open during soldering to prevent heat damage to internal components like seats or seals.
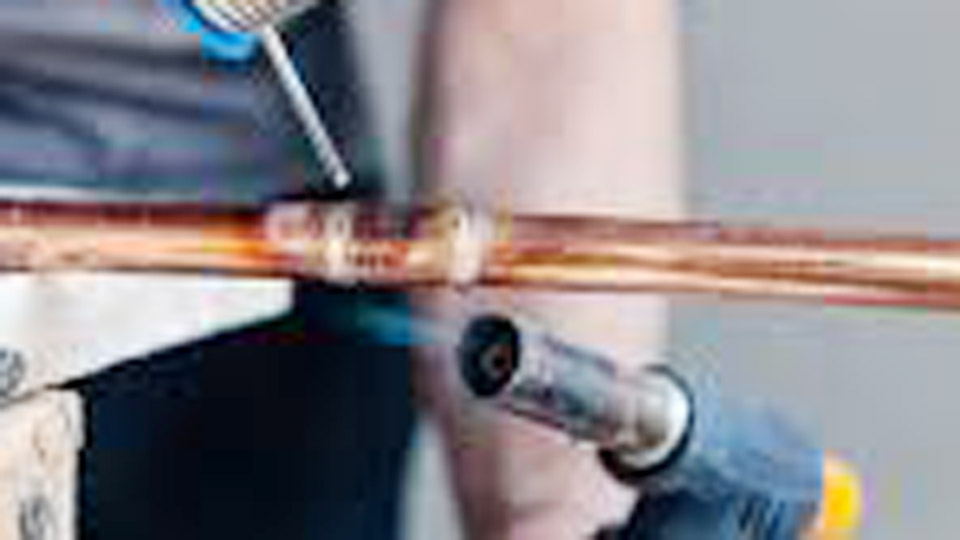
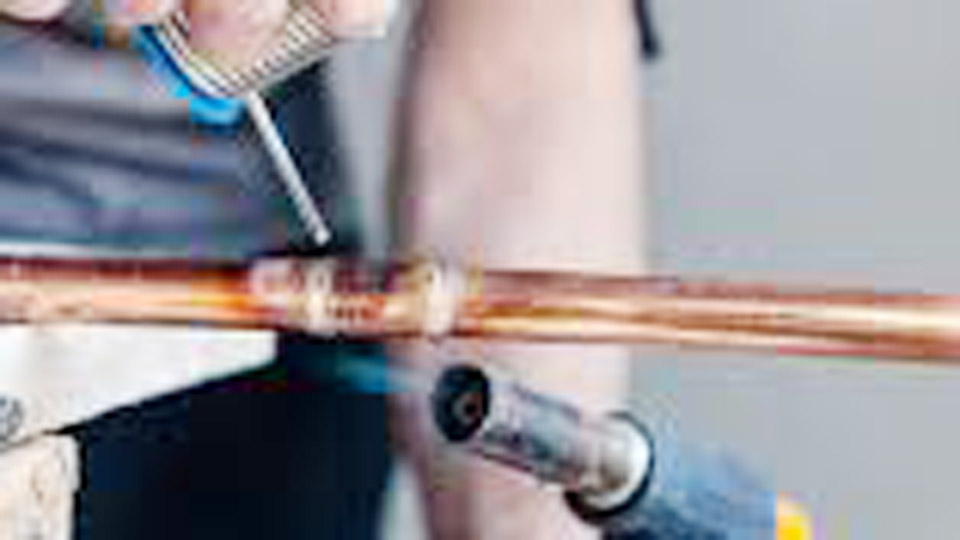
Soldering Process and Heat Management
Heating Strategy for Dissimilar Metals
Apply flame primarily to the brass fitting first, as it absorbs heat more slowly. Use a sweeping motion to bring the entire joint area to temperature evenly—avoid concentrating on one spot. Watch for flux bubbling and changing from milky to clear or brownish, signaling readiness (typically 400–550°F).
Once the fitting is hot, move heat to encompass the copper pipe slightly. Touch solder to the opposite side of the joint from the flame. Capillary action pulls it in when temperatures are correct. Feed solder continuously until a full fillet appears around the joint without forcing excess.
Remove the flame immediately once solder flows fully—overheating burns flux and causes oxidation or cracking upon cooling.
Cooling and Post-Process Handling
Allow natural air cooling without quenching or disturbing the joint. Movement while semi-molten creates micro-cracks. After cooling, wipe away flux residue thoroughly with a damp cloth or recommended cleaner, as leftover flux is corrosive over time.
Pressure-test the system before burying lines or closing walls.
Troubleshooting Common Failure Modes
Solder Not Flowing or Beading Up
This usually stems from insufficient cleaning, old/stirred flux, or uneven heating. Re-clean and reflux. On stubborn brass, preheat the fitting longer and use a more aggressive tinning flux.
Leaks After Pressure Testing
Often due to incomplete fill from cold spots or movement during cooling. Disassemble, re-clean thoroughly, and re-solder. Larger gaps require more solder or silver alloy for bridging.
Overheated Joints and Discoloration
Excessive heat creates hard-to-clean scale and weakens the joint. Practice on scrap to develop timing. Use heat sinks or shields on adjacent components.
Advanced Techniques and Variations
Soldering Larger Diameter or Heavy Brass Fittings
For 1.25-inch and above or thick-walled brass, MAPP or oxy-acetylene becomes necessary. Preheat broadly, then focus heat. Multiple passes with solder may be required for full penetration. Consider brazing alloys (higher temperature, silver content) for superior mechanical strength in high-vibration or high-temperature applications.
Vertical, Overhead, and Confined Space Considerations
In vertical runs, start heating at the bottom and work upward. Overhead joints demand precise control and often more flux for better flow against gravity. Use fire-resistant blankets liberally and have a spotter if working in tight spaces.
Integration with Other Materials
When transitioning copper-brass to other systems (e.g., PEX or galvanized), use dielectric unions or approved transition fittings to prevent galvanic corrosion. Soldering remains the most reliable for permanent copper-brass interfaces.
When to Choose Soldering vs. Alternatives
Soft soldering excels for most residential and light commercial plumbing due to accessibility and cost. For structural or high-heat applications, silver brazing offers higher tensile strength and temperature resistance. Mechanical press-fit or compression fittings provide speed in accessible areas but lack the permanence of a properly soldered joint.
Evaluate system pressure, fluid type, temperature range, and accessibility before deciding. Soldered copper-brass remains the gold standard for reliability when executed correctly.
Performance Takeaway
Consistent success in soldering copper pipe to brass fittings hinges on respecting the thermal differences—prioritize thorough cleaning, appropriate flux for brass, deliberate heating of the fitting first, and immediate flux removal.
Pros achieve near-perfect joints by developing muscle memory for heat timing and capillary cues. The next level involves experimenting with silver-bearing solders for demanding environments, yielding joints that outperform code minimums in both strength and longevity.
FAQ
Can I use the same flux for copper-to-copper and copper-to-brass?
Not always optimally. While basic water-soluble fluxes work for copper, brass benefits from tinning or petroleum-based fluxes that handle its slower heat-up and different oxide layer more effectively.
What torch fuel is best for soldering brass fittings?
MAPP gas provides the extra heat needed for reliable flow into heavier brass without excessive time. Propane works for smaller jobs but may struggle with larger valves.
Why does my solder not stick to the brass fitting?
Usually insufficient cleaning, incompatible/old flux, or heating the pipe instead of the fitting first. Brass needs targeted heat and fresh flux.
Is it safe to solder near existing water lines or valves?
Yes, with precautions: open valves, use heat shields, and avoid overheating internals. Drain lines if possible to reduce steam pressure risks.