Factory battery packs often leave nickel strips locked to cell terminals with multiple strong spot welds. When those welds refuse to release cleanly, the can deforms, the terminal tears, or the cell vents. Knowing how to remove spot welds from battery terminals without that damage is the difference between usable harvested cells and scrap.
The problem is mechanical, not chemical. Each weld creates a localized fusion zone between the nickel strip (or nickel-plated steel) and the cell can. On many power-tool and e-bike packs the strip is 0.15–0.3 mm thick and receives two to four welds per terminal.
Pulling straight up shears the can metal rather than the weld. Grinding too aggressively removes the protective nickel plating and leaves steel exposed to moisture. The correct approach depends on weld strength, strip thickness, and whether the cells will be re-welded or soldered later.
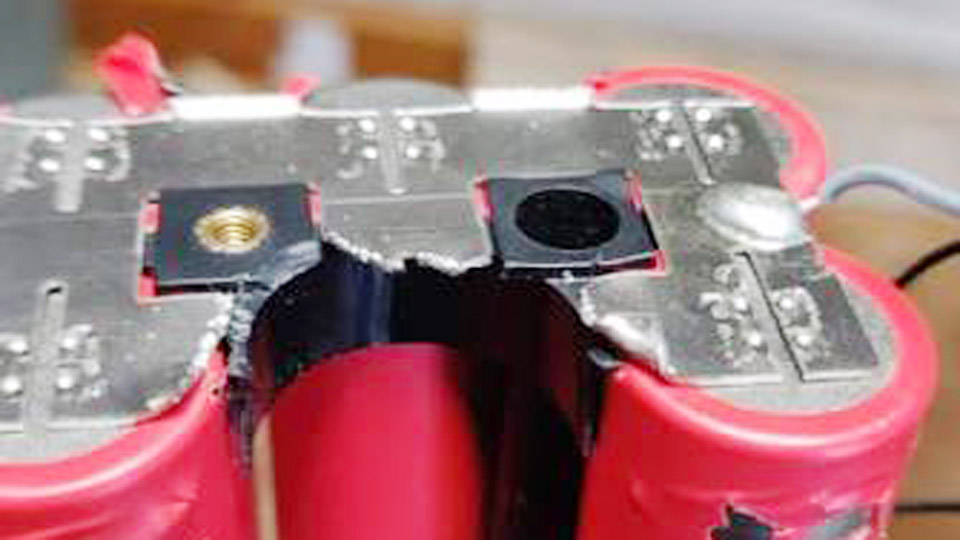
Image by stackexchange
Why Factory Spot Welds Resist Simple Peeling
Weld Geometry and Material Thickness Create the Failure Mode
Most cylindrical cells (18650, 21700) use pure nickel or nickel-plated steel strip. Pure nickel is softer and peels more readily; plated steel is harder and more common in high-current packs. Each weld leaves a small crater or “nugget” roughly 0.8–1.2 mm in diameter.
When the strip is thick and the welds are deep, the nugget holds more force than the thin can wall around it. Straight tension therefore pulls a divot or hole in the terminal rather than shearing the weld interface.
Parallel Groups Multiply the Risk
In multi-cell parallel blocks the strip often bridges several cells. Cutting one cell free still leaves the remaining welds on neighboring cells under tension. That distributed load increases the chance of deforming multiple cans at once. Isolating each weld mechanically before applying force is the only reliable countermeasure.
Selecting the Removal Method by Weld Strength and Goal
Light-to-Medium Welds: Controlled Rolling with Pliers
When the strip is pure nickel under 0.15 mm and the welds show shallow penetration, needle-nose or flat-jaw pliers work well. Grip a free edge of the strip, roll the pliers tightly against the terminal face, and advance a few millimeters at a time. The rolling action converts tension into a progressive peel. Stop the moment the can begins to lift; switch to a different weld point rather than forcing the first one.
Heavy Factory Welds: Shear Before Pull
Thick plated-steel strip with deep dual or quad welds rarely yields to rolling alone. Place the cell or small parallel group horizontally. Use a large snap-off utility knife (box-cutter style) with the bevel parallel to the terminal. Strike the back of the blade with a light hammer so the edge shears through the strip immediately beside each weld nugget.
Once the continuous strip is severed, the remaining tabs can be rolled off with far less force. This method keeps the can wall under compression rather than tension and dramatically reduces puncture rate on high-strength packs.
Grinding and Abrasive Approaches When Surface Flatness Matters
If residual nubs must be removed for a new flat weld surface, a rotary tool with a small carbide burr or diamond grinding stone is more controllable than a full-size angle grinder. Hold the cell slightly nose-up so debris falls away from the positive vent. Work only the raised weld material; stop the instant the original nickel plating appears.
Over-grinding exposes base steel that will rust later unless immediately protected. Fine abrasive sanding discs (180–240 grit) on a low-speed angle grinder can process multiple cells in a fixture, but heat buildup and conductive dust become additional hazards.
Tool Choices That Actually Control the Outcome
Flush Cutters and Side Cutters for Isolation
High-quality flush cutters let you sever the nickel strip within 0.5 mm of the weld without lateral force on the can. After isolation, the remaining short tab has almost no leverage to tear the terminal when peeled. Cheap cutters crush rather than shear and leave a jagged edge that is harder to grip cleanly.
Rotary Tools and Burr Selection
A 3–6 mm carbide ball-nose or cylindrical burr removes the weld nugget with minimal side pressure. Diamond-coated bits generate finer dust that is less likely to bridge terminals if the cell is oriented correctly. Avoid coarse grinding stones that load with nickel and then dig into the can.
Fixtures and Holding Methods
A simple V-block or plastic tube guide keeps the cell axis perpendicular to the abrasive surface. For parallel groups still partially connected, a wooden or 3-D-printed cradle that supports the cells from the sides prevents the pack from shifting while individual strips are cut.
Never rely on hand pressure alone when using powered tools; a slip can drive the burr through the can wall in a fraction of a second.
Surface Condition After Removal and Its Effect on Re-Welding
Leaving Controlled Residual Nubs
Many experienced rebuilders deliberately leave the original weld points intact when they are not excessively raised. New nickel strip is then spot-welded directly over the existing nuggets.
The manufacturer already optimized penetration depth for that can thickness; stacking a new weld on the same location often produces stronger results than welding onto a freshly ground surface that has lost some of its plating.
Cleaning and Protecting Exposed Steel
Any area where plating has been removed should be cleaned of metal dust with a soft brush or compressed air, then immediately covered. A thin film of petroleum jelly, a small piece of Kapton tape, or a light coating of conductive nickel paint (if soldering will not be used) slows oxidation. For cells that will sit for weeks before reassembly, store them in a dry container with desiccant.
Terminal Flatness Requirements
Spot welders need consistent electrode contact. Raised nubs greater than about 0.3 mm can cause the electrode tips to rock and produce uneven current density. Light hand filing or a brief pass with a fine burr is usually enough; aggressive flattening risks reducing the can wall thickness and compromising the positive vent mechanism.
When Full Removal Is the Wrong Decision
Assessing Cell Value Versus Risk
High-capacity or low-internal-resistance cells justify extra care. Marginal cells from older packs often do not. If more than two or three attempts at clean removal are required, the probability of latent damage (micro-cracks that later cause high self-discharge) rises sharply. At that point it is faster and safer to cut the strip and leave the cell in the original configuration or discard it.
Positive Versus Negative Terminal Differences
The positive terminal incorporates a vent and is more sensitive to deformation. Excess force here can close the vent path or create a leak path for electrolyte vapor.
The negative end is usually a solid can bottom and tolerates slightly more mechanical stress, but a puncture there still allows internal shorting and eventual failure. Always treat both ends as critical.
Practical Sequence for a Typical Power-Tool Pack
Begin by discharging the pack to a safe voltage and isolating the BMS. Cut the outer nickel bus bars so that individual parallel groups can be handled. On each group, use flush cutters to sever the strip between cells, leaving short tabs attached to each terminal.
Work one cell at a time: roll or shear the remaining tab, inspect the terminal for deformation, and set the cell aside for voltage and internal-resistance testing. Only after electrical verification should residual weld material be dressed if required for the new pack design.
For packs with unusually aggressive welds (common on some outdoor-equipment and e-bike batteries), the knife-and-hammer shear method followed by light abrasive cleanup consistently yields higher survival rates than pure peeling.
Decision Framework for Different Cell Destinations
If the cells will be re-spot-welded into a new configuration, prioritize methods that preserve as much original plating as possible and leave modest nubs. If the cells will be soldered, a flatter surface is more important and limited grinding becomes acceptable.
If the cells are destined for testing only or for low-value parallel banks, minimal intervention—cutting the strip and leaving the welds—is often the highest-yield choice.
The single most useful advanced insight is that the original weld location is usually the strongest and cleanest place to re-weld. Removing every trace of the factory weld simply to achieve a perfectly flat surface frequently produces a weaker joint than stacking the new weld on the existing nugget after the excess strip has been trimmed.
FAQ
Can you remove spot welds from 18650 cells without a rotary tool?
Yes. Flush cutters to isolate the strip followed by careful rolling with pliers or a controlled knife-and-hammer shear remove most welds without powered abrasives. Rotary tools are only necessary when residual height must be reduced for electrode contact.
Is it safe to grind the terminal of a lithium-ion cell?
Limited grinding of raised weld material is common practice among rebuilders, provided the cell is oriented so debris falls away, heat is kept low, and plating is not completely removed. Aggressive grinding that thins the can wall or opens the positive vent is not safe.
Should leftover spot weld nubs be completely removed before re-welding?
No. Leaving the original nuggets and welding the new strip over them is often stronger and less damaging than grinding to bare metal. Only remove material that interferes with electrode contact or creates an uneven surface.
What happens if a cell is punctured during weld removal?
A puncture usually leads to gradual electrolyte loss, rising internal resistance, and eventual zero voltage. In the worst case the cell can enter thermal runaway. Any cell that shows a hole, deep divot, or electrolyte odor should be isolated and disposed of properly rather than reused.