Building your own welding table can save you money, give you a reliable workspace, and let you customize for your needs. Many beginners think a welding table must be expensive or complicated, but you can make a cheap welding table with basic tools and smart planning.
Whether you’re a hobbyist or starting a small workshop, this guide will show you step-by-step how to build a sturdy, affordable welding table, explain what really matters, and help you avoid common mistakes. You’ll also see real examples, data, and comparisons to make your decisions easier.
Why You Need A Welding Table
A welding table is more than just a flat surface. It helps with:
- Safety: Keeps sparks and heat away from flammable materials.
- Accuracy: Makes it easier to measure, clamp, and position pieces.
- Efficiency: Speeds up your work and reduces frustration.
Many welders start by using old wood benches or makeshift surfaces. These can be unsafe and hard to clean. A proper welding table, even a cheap one, gives you a solid foundation for your projects.
Planning Your Cheap Welding Table
Before you start buying materials or cutting metal, you need a clear plan. Consider these factors:
Size And Workspace
Think about the projects you want to do. For small jobs, a table 2 feet by 3 feet is enough. For larger work, aim for 3 feet by 5 feet. Make sure you have space to move around and access all sides.
Table Height
Most welding tables are 30 to 36 inches tall. Adjust based on your height and comfort. Standing tables are common, but some people prefer a lower table for seated work.
Material Choices
For the surface, steel is best. Wood catches fire and aluminum is too soft. The frame can be made from steel angle iron or square tubing. Look for scrap metal or offcuts to save money.
Budget And Cost Estimates
A basic welding table can cost $70 to $200 if you use recycled materials. Buying everything new can push the cost to $300 or more.
| Material | Source | Cost (Approx.) |
|---|---|---|
| Steel plate (top) | Scrap yard | $40–$90 |
| Angle iron/square tube (frame) | Hardware store | $20–$60 |
| Legs (pipe/tube) | Salvaged | $10–$40 |
| Fasteners/wheels | Online/local | $10–$30 |
Tools Needed
You don’t need expensive tools. Basic requirements:
- Welder (MIG or stick)
- Angle grinder (for cutting and cleaning)
- Measuring tape and marker
- Clamps
- Safety gear (gloves, goggles)
Many beginners miss that you can rent tools or borrow from friends. This can reduce your cost even more.

Credit: www.youtube.com
Choosing Materials: Cheap But Strong
The right materials make all the difference. Here’s how to pick wisely:
Steel Tabletop
A 3/16-inch to 1/4-inch thick steel plate works well. Thinner plates can warp, thicker plates are heavy and expensive. If you find a used plate with surface rust, don’t worry—clean it with a grinder.
Frame
Use angle iron or square tubing. Angle iron is cheaper and easier to weld, but square tubing is stronger. Try to get lengths that fit your table size to reduce waste.
Legs
Old steel pipes or square tubes make strong legs. If you want a movable table, add locking caster wheels.
Fasteners
For a budget build, weld joints directly. If you lack welding skill, you can bolt the frame together, but welded joints are stronger and cleaner.
Comparing Material Options
Here’s a quick comparison of frame materials:
| Material | Strength | Ease of Welding | Cost |
|---|---|---|---|
| Angle Iron | Medium | Easy | Low |
| Square Tubing | High | Moderate | Medium |
| Pipe | High | Hard | Low–Medium |
Non-obvious tip: Many scrap yards will cut steel for you, saving time and making transport easier.
Step-by-step Guide: Building Your Cheap Welding Table
Let’s break the process down so you can follow easily.
1. Measure And Cut Materials
Use your tape measure and marker to lay out cuts. Double-check measurements before cutting. Cut steel with an angle grinder or metal saw. Clean edges with a grinder.
Pro tip: Mark each piece with chalk so you don’t mix up parts.
2. Assemble The Frame
Lay out frame pieces on a flat surface. Start with the long sides, then add the short sides. Clamp corners to keep them square. Tack weld joints first—don’t fully weld until you check alignment.
3. Attach The Legs
Position legs at each corner. Clamp and tack weld one at a time. Check that all legs are level. For extra strength, add cross braces between legs.
4. Add Tabletop
Place the steel plate on the frame. Align edges so the tabletop hangs evenly. Weld or bolt the plate onto the frame. If using bolts, drill holes in both the plate and frame.
5. Add Optional Features
You can add caster wheels for mobility, tool holders, or a grounding lug for welding. For cheap builds, keep extras simple.
6. Clean And Finish
Grind welds smooth, remove sharp edges, and clean surface rust. You can paint the frame to prevent corrosion—just don’t paint the tabletop, as paint burns during welding.
7. Test Your Table
Check stability by pushing on all sides. Make sure the table does not rock or move. Place a heavy object on the tabletop to test load capacity.
Example Build: Budget Welding Table
Here’s a real example:
- Size: 2.5 feet x 4 feet
- Top: 3/16-inch steel plate from a scrap yard ($60)
- Frame: Angle iron ($25)
- Legs: Old steel pipes ($15)
- Wheels: Salvaged from old cart ($10)
- Fasteners: Welded joints
- Tools: Borrowed welder, angle grinder
Total cost: $110. Time: 4 hours.
Many beginners miss that old steel can work just as well as new, if cleaned properly.
Practical Tips For Saving Money
Building cheap doesn’t mean building weak. Here are ways to cut costs:
- Use recycled steel. Old shelves, bed frames, or machine bases can become your table.
- Buy offcuts. Many steel suppliers sell leftover pieces at a discount.
- Rent tools. Local hardware stores often rent welders and grinders.
- Skip fancy features. Start with a basic table, add extras later.
- Trade with friends. Offer to weld something for someone in exchange for materials.
Non-obvious insight: Some online forums have “swap” sections where you can find free or cheap metal.
Comparing Cheap Welding Table Designs
Different designs suit different needs. Here’s a comparison:
| Design | Cost | Strength | Features |
|---|---|---|---|
| Basic frame + steel top | Lowest | Good | None |
| Frame + steel top + wheels | Low–Medium | Good | Mobility |
| Frame + steel top + tool holders | Medium | Good | Convenience |
| Frame + steel top + shelf | Medium–High | Best | Storage |
For most beginners, start with a basic frame and steel top. You can add shelves or holders later.
Common Mistakes And How To Avoid Them
Many new welders make these mistakes:
- Choosing thin steel: Tabletop bends or warps easily.
- Poor alignment: Table wobbles or is not square.
- Skipping cross braces: Legs buckle under weight.
- Painting the tabletop: Paint burns during welding and contaminates work.
- Not grounding properly: Risk of electrical issues.
Always double-check measurements and use cross braces for stability. Clean steel before welding for best results.
Safety Considerations
Safety is critical when building and using a welding table.
- Wear gloves and goggles when cutting or welding.
- Work in a well-ventilated space.
- Keep a fire extinguisher nearby.
- Ground your table during welding to prevent electrical shocks.
Don’t forget to clear the area of flammable materials before starting.
Upgrading Your Cheap Welding Table
Once your basic table is working well, you can upgrade:
- Add a lower shelf for tools.
- Install clamp slots for easier positioning.
- Attach a vice for holding work.
- Add power outlets nearby.
You don’t need to do everything at once. Small upgrades can be added over time.
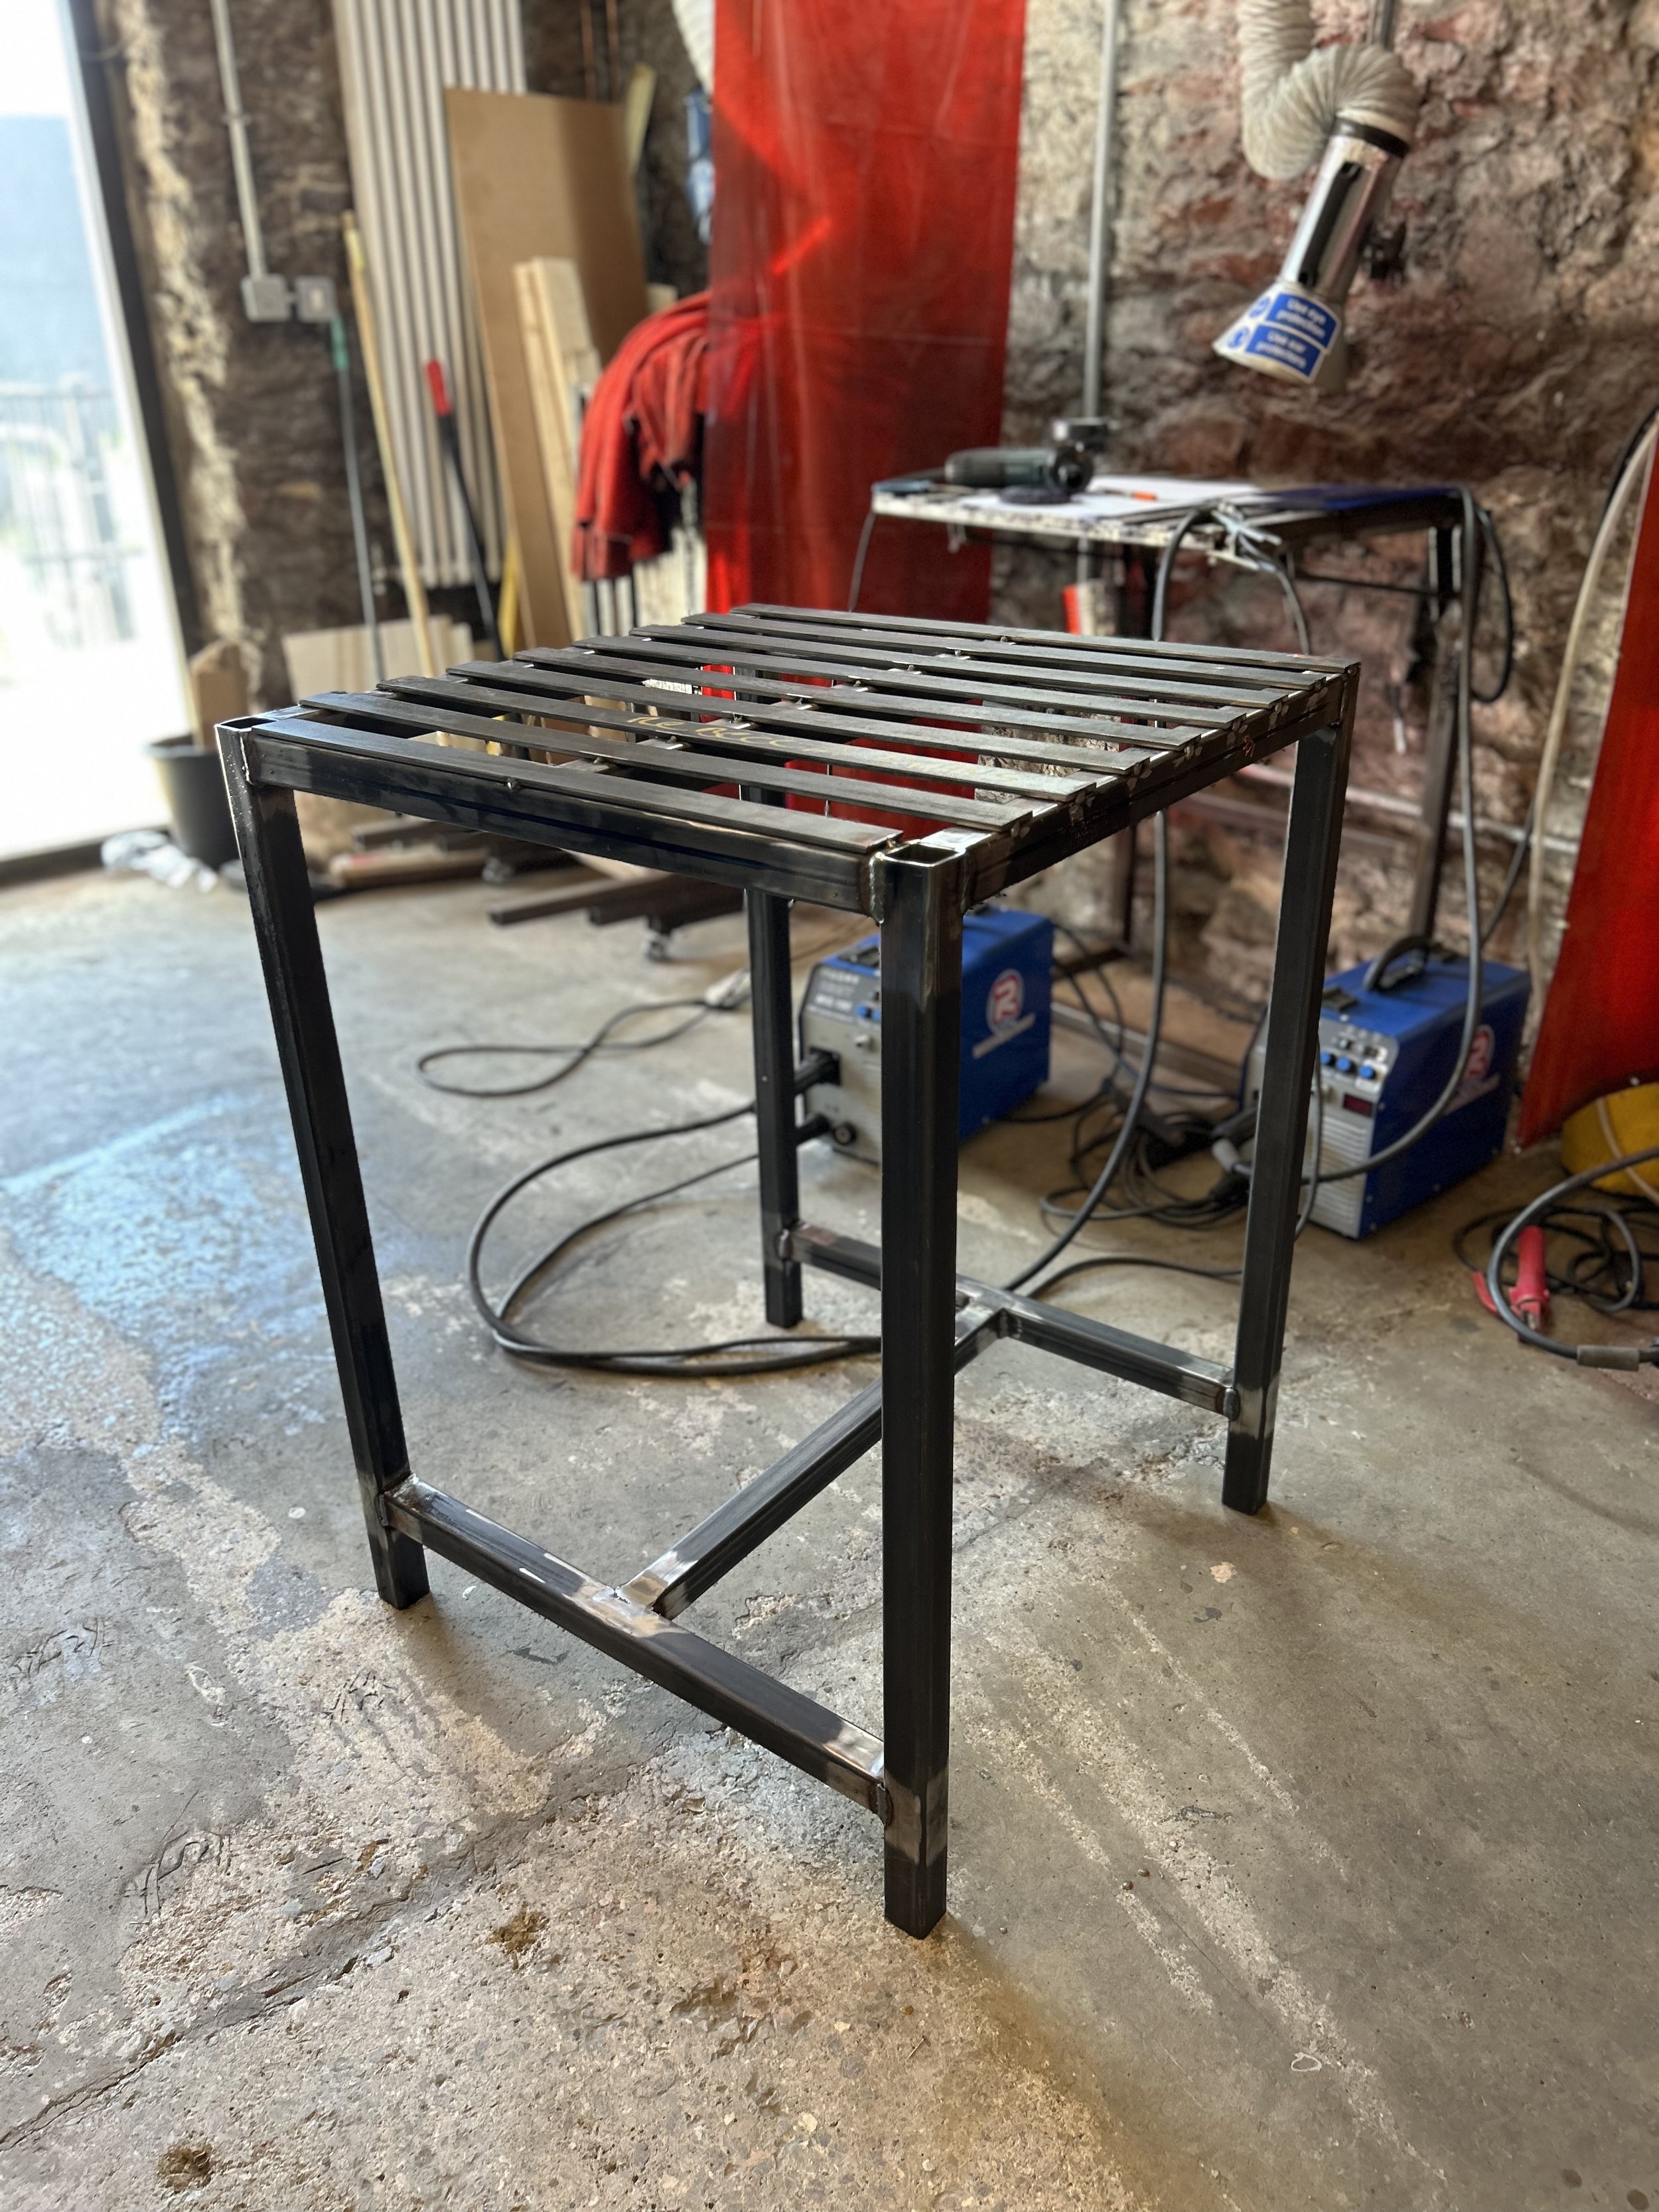
Real Data: Welding Table Load Capacity
A well-built cheap welding table can handle heavy loads. For example:
- A 3/16-inch steel plate can support over 350 lbs if properly supported.
- Angle iron frames can hold 200–400 lbs depending on thickness.
If you need more capacity, use thicker steel and stronger frame materials.
Credit: theweldspace.co.uk
Maintenance And Longevity
To keep your welding table working for years:
- Clean the tabletop after each use.
- Oil moving parts like wheels.
- Check welds and bolts for cracks or looseness.
- Avoid leaving wet materials on the steel to prevent rust.
Proper care means your cheap welding table can last as long as expensive models.
Where To Find Cheap Materials
Here are places to look for cheap steel and parts:
- Scrap yards: Often have steel plates and pipes for low prices.
- Online classifieds: Sites like Craigslist, Facebook Marketplace.
- Local metal shops: Ask for offcuts or leftovers.
- Construction sites: Sometimes give away scrap metal.
- Community workshops: May offer free or discounted materials.
Always check for rust and damage before buying used steel.
Example Calculation: Total Cost Breakdown
Let’s break down the cost for a typical cheap welding table:
- Steel top: $70 (scrap yard)
- Angle iron: $30 (hardware store)
- Legs: $20 (salvaged pipes)
- Wheels: $15 (used)
- Fasteners: $10
- Tools: Borrowed (free)
Total: $145
If you buy everything new, expect to pay around $250–$300.
Expert Insight: What Really Matters
Beginners often focus on features or looks, but these are the key factors:
- Flatness: A flat steel top is essential for accurate welding.
- Stability: A wobbling table makes work dangerous and frustrating.
- Accessibility: Make sure you can reach all parts of your project.
Don’t worry about scratches or dents—these don’t affect performance.
When To Build Vs. Buy
Should you build or buy a welding table? Here’s how to decide:
- Build if you want to save money, customize size, and enjoy the process.
- Buy if you need advanced features or lack tools/time.
Many commercial tables start at $400–$800. A homemade table can be just as strong for less than half the price.
Final Thoughts
Building a cheap welding table doesn’t mean you sacrifice quality. With the right plan and materials, you can create a reliable, safe, and efficient workspace that will serve you for years. Focus on what matters—flatness, strength, and accessibility—and you’ll soon enjoy welding projects with confidence.
Frequently Asked Questions
What Thickness Of Steel Should I Use For The Tabletop?
For most projects, 3/16-inch to 1/4-inch steel plate is ideal. Thinner plates can bend or warp, while thicker plates are harder to work with and expensive.
Can I Use Wood For The Welding Table Surface?
No, wood is not safe. It can catch fire from sparks and heat. Always use steel for the tabletop.
Do I Need A Ground Clamp For My Welding Table?
Yes. A ground clamp improves welding quality and safety. Attach it directly to the steel tabletop.
How Can I Make My Welding Table Movable?
Add locking caster wheels to the legs. Make sure the wheels can handle the table’s weight and lock firmly to keep the table stable.
What Is The Best Way To Clean A Steel Tabletop?
Use an angle grinder with a wire brush attachment to remove rust and debris. Wipe with a dry cloth after cleaning. Avoid using water, as it can cause rust.