Building a welding jig table can transform the way you approach metalwork. With a reliable jig table, you’ll work faster, safer, and more accurately. But making your own requires careful planning, the right materials, and some practical welding skills.
Whether you’re a hobbyist or a professional, this guide will show you how to create a sturdy, functional welding jig table from scratch.
By the end, you’ll understand every step and know how to avoid common mistakes that beginners often make.
Why A Welding Jig Table Matters
A welding jig table is more than just a flat surface. It helps you position, clamp, and weld parts with precision. Professionals use jig tables to speed up repetitive jobs and ensure every weld is consistent. Beginners often underestimate how much time and frustration a good table can save.
For example, without a proper jig table, you might spend hours trying to hold parts in place, only to end up with crooked welds.
Some key benefits include:
- Stability: Heavy-duty tables don’t move or vibrate, so your work stays accurate.
- Versatility: Holes and slots let you clamp parts anywhere, making complex projects easier.
- Safety: Workpieces are secured, reducing the risk of burns or injuries.
A well-built jig table can last for decades. With careful maintenance, you’ll use the same table for hundreds of projects.
Planning Your Welding Jig Table
Before you start cutting steel, you need a solid plan. The right design depends on your workspace, the projects you do, and your budget.
Deciding The Size
Most home workshops use tables between 3ft x 4ft and 4ft x 8ft. If you work with large frames or want room for multiple jobs, go bigger. For small parts or limited space, a compact table is easier to move.
Choosing Materials
Steel is the standard choice because it withstands heat and won’t warp. Mild steel (like A36) is affordable and strong. For the tabletop, 1/4” to 1/2” thickness is common. Thicker steel resists warping but costs more.
Budget Estimates
Here’s a comparison of typical material costs:
| Material | Estimated Cost (per sq ft) | Durability |
|---|---|---|
| 1/4″ Mild Steel Plate | $25–$40 | Good |
| 1/2″ Mild Steel Plate | $45–$70 | Excellent |
| Aluminum | $70–$120 | Fair (not ideal for welding) |
Most people use mild steel because it balances cost and performance. If you find used steel plates, you can save money, but check for warping or deep rust.
Table Height
Standard welding tables are 32–36 inches tall. If you’re tall, aim for the higher end. Adjustable legs can help, but they add complexity.
Surface Features
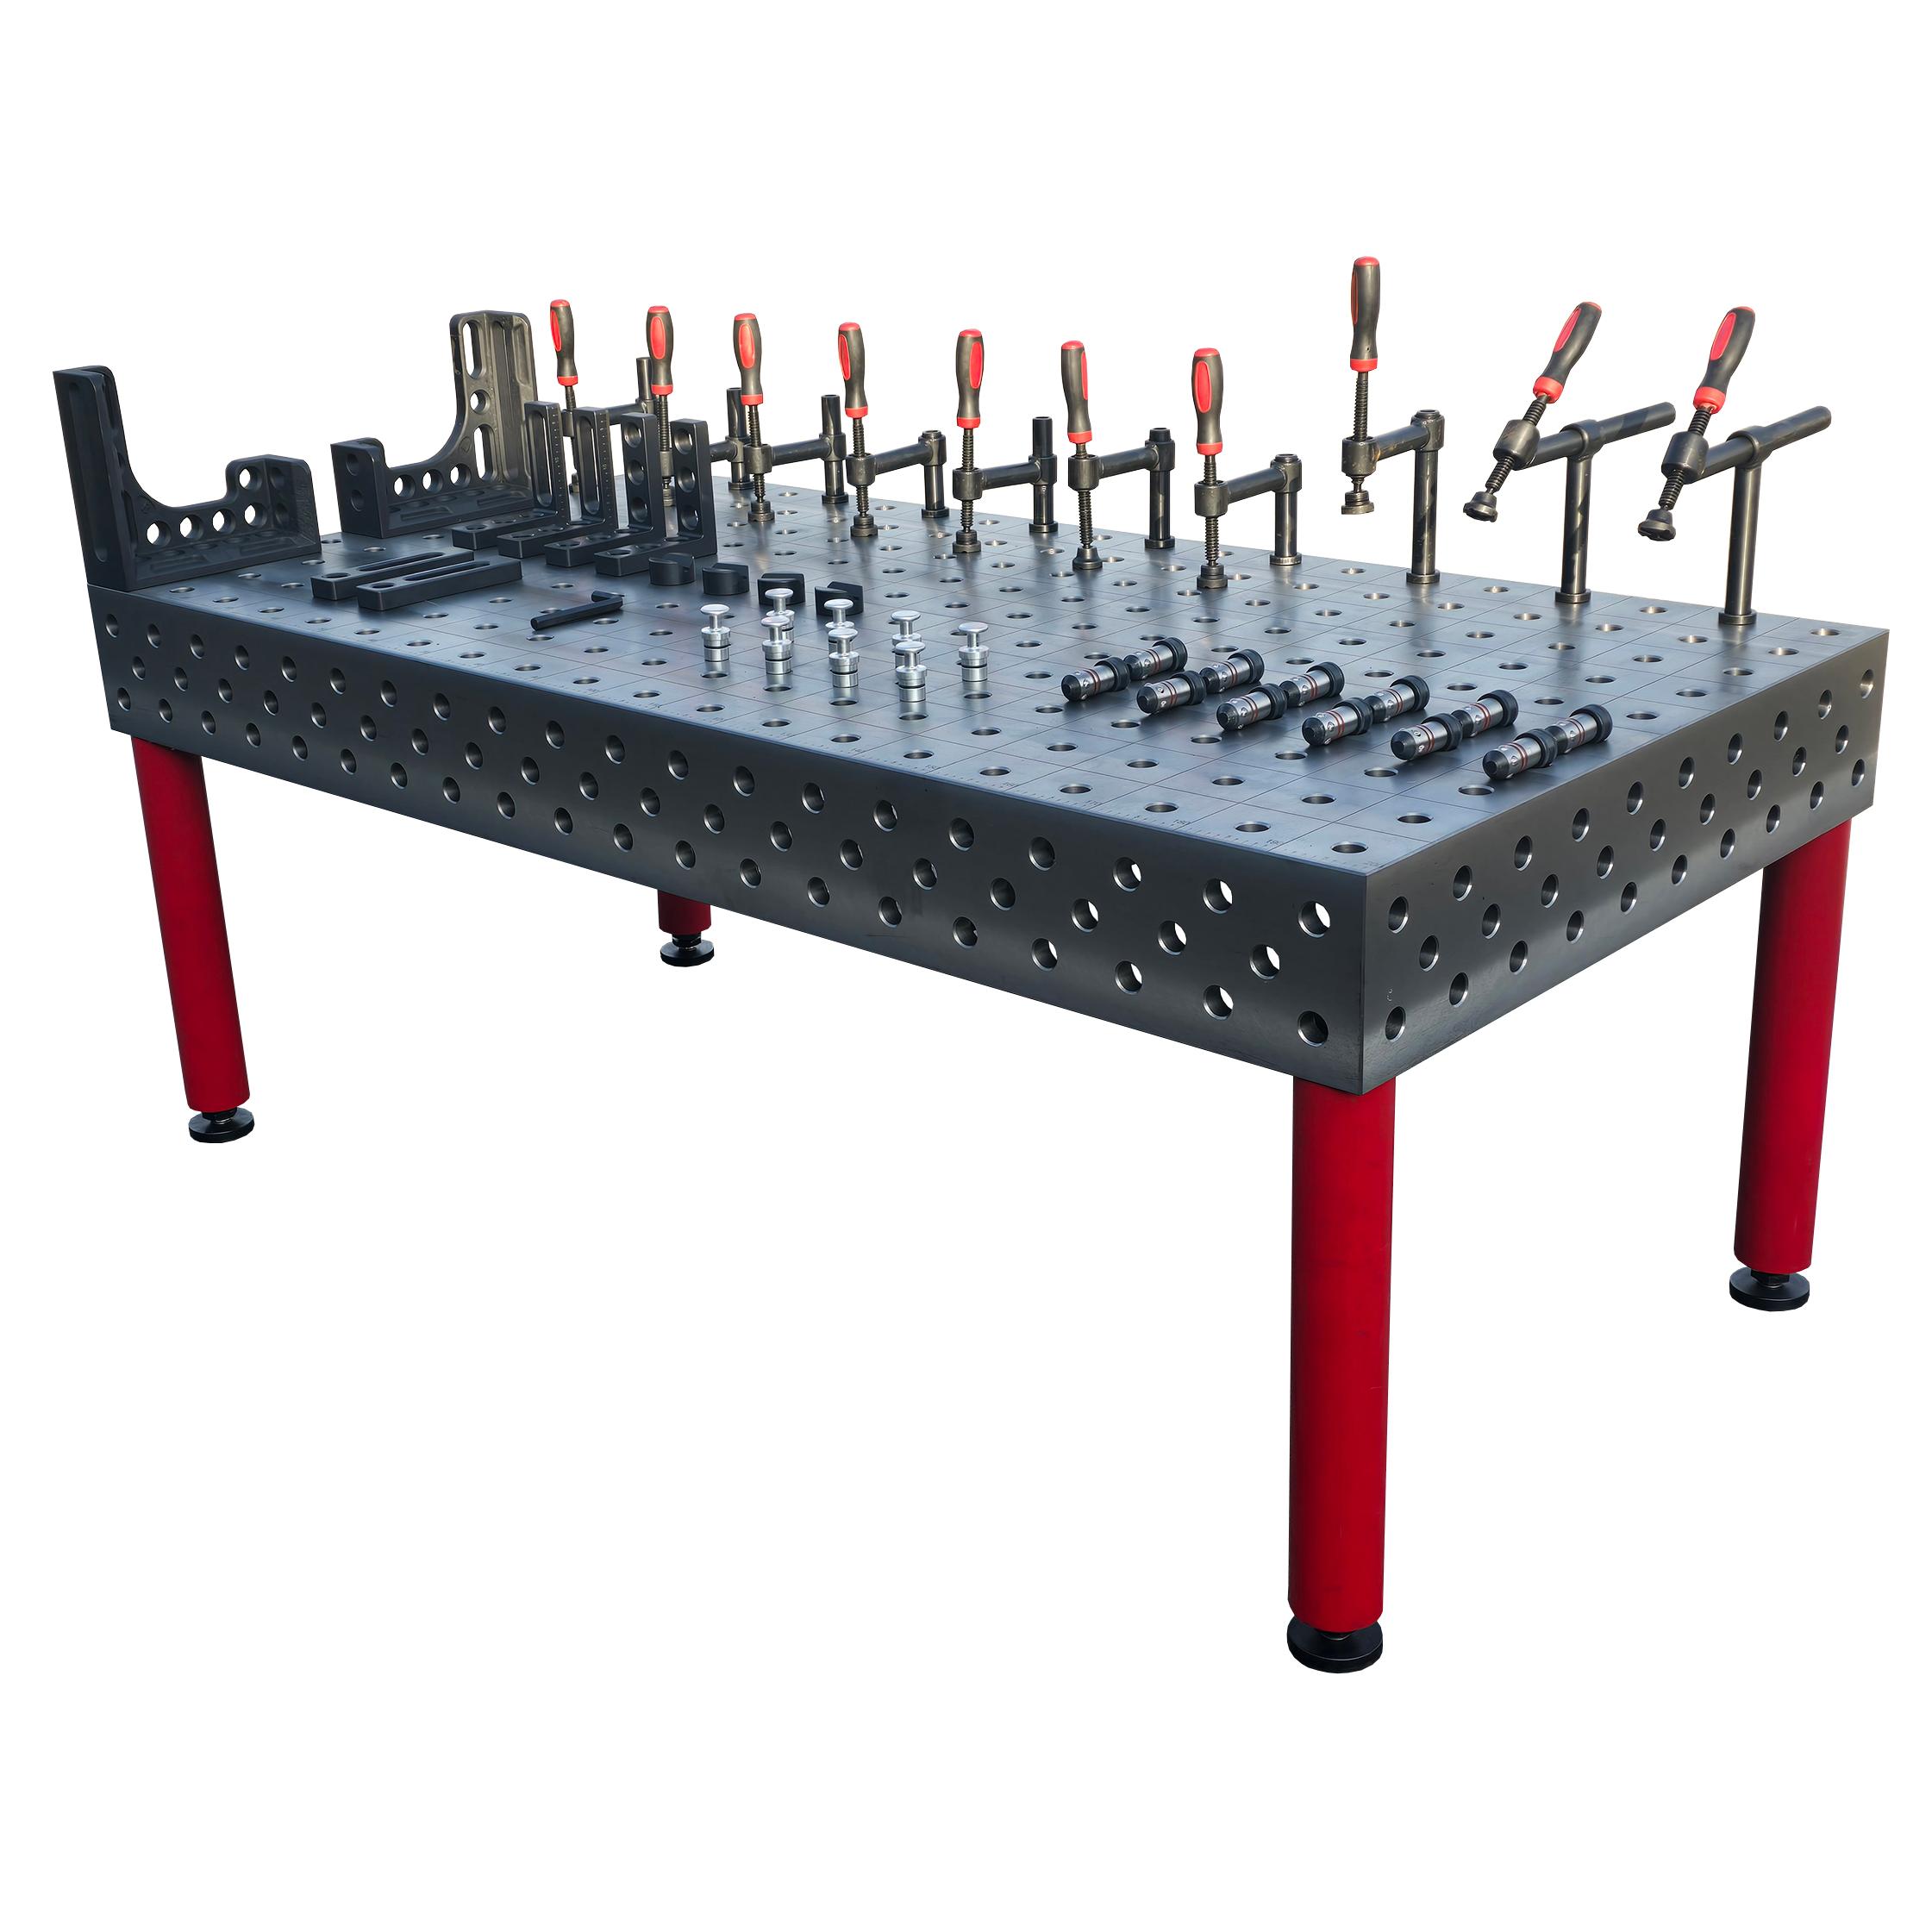
Decide if you want holes, slots, or a plain top. Holes (often 5/8” or 16mm) let you use clamps anywhere. Slots are helpful for custom fixtures. Beginners often skip these, but adding them makes your table much more flexible.
Credit: www.redlinestands.com
Gathering Materials And Tools
Before you start, make a checklist. Missing tools can slow you down or make jobs unsafe.
Materials
- Steel plate (for tabletop)
- Square steel tubing (for frame and legs)
- Leveling feet or casters (optional)
- Welding clamps
- Angle iron (for reinforcement)
Tools
- Angle grinder (with cutting and flap discs)
- Welding machine (MIG or stick preferred)
- Measuring tape
- Speed square
- Drill press (for holes)
- C-clamps
- Safety gear (helmet, gloves, jacket)
Some workshops use plasma cutters or CNC machines to make holes, but you can use a drill press for most jobs.
Designing Your Welding Jig Table
A good design keeps your table strong and square. If you skip this step, you risk building a table that wobbles or wears out quickly.
Basic Table Structure
Your table will have a steel plate top, a square tubing frame, and four sturdy legs. Reinforce the frame with crossbars to prevent twisting.
Sample Dimensions
Let’s say you want a 4ft x 3ft table with a 1/4” top.
- Top plate: 48” x 36” x 1/4”
- Frame: 2” x 2” x 1/8” square tubing
- Legs: 32” tall, same tubing
Add two crossbars under the tabletop, running lengthwise. They prevent sagging, especially if you weld heavy parts.
Drawing Your Plan
Sketch your table on paper. Mark where the legs and crossbars go. Plan where you’ll add holes or slots. This step avoids mistakes later.

Credit: www.youtube.com
Preparing Your Workspace
A clean, organized workspace makes the job safer and faster. Clear enough room to move around the table. Lay out all materials and tools before starting.
Check the floor: a level surface helps you build a square table. If your floor isn’t flat, use shims or temporary supports to keep everything aligned.
Cutting And Preparing Steel
Cutting steel is noisy and messy. Wear safety gear and work slowly.
Cutting The Top Plate
Measure twice, cut once. Use an angle grinder or metal saw for small plates. For large plates, a plasma cutter is faster but requires skill.
Cutting Tubing For Frame And Legs
Measure your tubing carefully. Cut all four legs to the same length. Cut frame pieces to match the tabletop size. For crossbars, subtract the thickness of frame pieces so they fit snugly.
Deburring And Cleaning
After cutting, steel edges are sharp. Use a flap disc to smooth them. Clean surfaces with a wire brush. Remove rust, oil, or paint—clean steel welds better.
Assembling The Frame
This is where many beginners make mistakes. If your frame isn’t square, your table won’t be stable.
Laying Out The Frame
Lay frame tubing on the floor. Use a speed square to check corners. Clamp everything tightly.
Tack Welding
Don’t weld everything at once. Tack weld corners first. Check for square after each tack. If something moves, break the tack and realign.
Welding The Joints
Once you’re happy with alignment, weld all joints solidly. Weld in short sections to avoid warping. Alternate sides to balance heat.
Adding Crossbars
Position crossbars under the tabletop. Tack, check alignment, then weld. Reinforcement is key for long-term durability.
Attaching The Tabletop
Place the steel plate on your finished frame. Center it carefully. Clamp it down so it doesn’t shift.
Weld the plate to the frame in short sections. Let each weld cool before moving to another area. This prevents warping—a common mistake with thin plates.
If you plan to add holes or slots, mark them now before final welding. Some people bolt the tabletop instead of welding, so they can replace it later. Bolting works, but welded tops are sturdier.
Adding Holes And Slots
Holes are the heart of a real jig table. They let you position clamps and fixtures anywhere.
Marking Hole Locations
Use a grid pattern. Most tables use holes every 4” in both directions. Mark carefully with a center punch so your drill won’t slip.
Drilling Holes
A drill press is best. Start with a small pilot hole, then step up to final size. For thick steel, use cutting oil and go slow. If your plate is over 1/2” thick, consider professional help or a plasma cutter.
Cleaning Up Holes
Deburr holes with a reamer or flap disc. This protects clamps and your hands.
Slots can be cut with a grinder or plasma cutter. They’re useful for unique fixtures.
Installing Leveling Feet Or Casters
If your floor isn’t perfectly flat, leveling feet help. Casters let you move the table, but they must lock to prevent rolling during welding.
Here’s a comparison of leveling options:
| Feature | Leveling Feet | Casters |
|---|---|---|
| Mobility | None | Excellent |
| Stability | High | Medium (locks required) |
| Cost | $15–$40 for four | $30–$80 for four |
For most workshops, leveling feet are safer. If you need mobility, use heavy-duty casters with strong locks.

Credit: www.tycaindustries.com
Surface Treatments And Maintenance
Bare steel rusts quickly. Protect your table with a light coat of oil or wax. Some people use paint, but it can interfere with welding.
Surface Treatments
- Paste wax: Easy to apply, prevents rust
- Light oil (WD-40): Protects from moisture
- Galvanizing: Expensive, not common for tables
Apply wax or oil monthly. Clean spatter and debris after each job.
Using Your Jig Table Effectively
Once your table is ready, you can use it for many tasks. Here are practical ways to get the most out of it:
Clamping Techniques
Use different clamps for different jobs:
- C-clamps: For heavy parts
- Quick clamps: For fast jobs
- Magnetic squares: Hold pieces at angles
Combine clamps and fixtures to hold complex assemblies. Don’t force parts into position; adjust clamps for a better fit.
Fixture Setup
Make custom fixtures for repeated jobs. Use the holes to mount stops or guides. This speeds up production and improves accuracy.
Welding Tips
Keep your table clean. Spatter, slag, and debris reduce accuracy. Clean after every project. If you weld aluminum or stainless, use special clamps to avoid contamination.
Common Beginner Mistakes
Even experienced welders make errors when building their first jig table. Here are a few to watch out for:
- Skipping reinforcement: Without crossbars, your table will sag over time.
- Ignoring leveling: A crooked table causes bad welds.
- Welding too fast: Heat warps steel. Let welds cool between sections.
- Missing holes: You can’t add holes easily after the table is finished.
- Poor surface prep: Dirty steel leads to weak welds.
Take your time. Double-check measurements before cutting. If you make a mistake, fix it before moving on.
Advanced Features To Consider
If you want a truly professional jig table, consider these upgrades:
Modular Fixtures
Some tables use removable plates or rails. You can change fixtures for different jobs. This is common in industrial shops.
Precision Machining
A machined tabletop is perfectly flat. This costs more, but improves accuracy for tight-tolerance projects.
Integrated Electrical Outlets
Install outlets on the frame for tools, grinders, or lights. Use weatherproof covers to protect from sparks and dust.
Fume Extraction
Add a small extractor or fan near the table. Welding fumes are dangerous, especially indoors. This upgrade is essential for health.
Real-life Example
Let’s look at a real-world project. John, a hobby welder in Texas, built a 4ft x 4ft jig table for under $400. He used a 1/4” steel plate, square tubing, and leveling feet. John drilled holes every 4” in a grid pattern.
He reinforced the frame with two crossbars and added custom clamps for bicycle frames. After two years, his table is still flat and rust-free thanks to regular waxing.
Practical Tips For Longevity
If you want your table to last, follow these tips:
- Don’t overload: Each table has a weight limit. For 1/4” steel, keep loads under 500 lbs.
- Check welds: Inspect joints every few months for cracks.
- Clean often: Remove spatter and debris after every job.
- Store indoors: Moisture causes rust.
- Use surface treatments: Wax or oil protects steel.
Safety Precautions
Welding is dangerous. Protect yourself and your workspace:
- Wear safety gear: Helmet, gloves, jacket, boots.
- Ventilate: Fumes are toxic. Open windows or use fans.
- Check electrical: Faulty tools can shock or start fires.
- Keep flammables away: Clean up oil, rags, and paper.
- Inspect tools: Damaged grinders or welders cause accidents.
Never weld alone. If something goes wrong, having help nearby makes all the difference.
Comparing Diy Vs. Commercial Jig Tables
Some people wonder if they should build or buy a jig table. Here’s a quick comparison:
| Feature | DIY Jig Table | Commercial Jig Table |
|---|---|---|
| Cost | $200–$800 | $1,000–$4,000 |
| Customization | High | Limited |
| Quality | Varies | Consistent |
| Assembly Time | 8–16 hours | Ready to use |
| Upgrade Options | Easy | Harder |
If you need a table for complex, precise jobs, buying might be better. But building your own is more affordable and lets you customize every feature.
Frequently Asked Questions
How Thick Should My Welding Jig Table Be?
For most projects, 1/4” steel plate is enough. If you weld heavy parts often, use 1/2” thickness. Thinner plates can warp; thicker plates last longer and stay flat.
Can I Use Wood For A Welding Jig Table?
No. Wood burns easily and doesn’t withstand welding heat. Always use steel or, for some special jobs, aluminum. Steel is safest for all welding types.
How Do I Prevent My Table From Rusting?
Apply paste wax or light oil after cleaning. Store your table indoors and avoid leaving moisture or spills on the surface. Monthly maintenance keeps rust away.
Is It Worth Adding Holes To My Jig Table?
Yes. Holes make clamping and fixtures much easier. They speed up projects and improve accuracy. Drilling holes during construction is much easier than adding them later.
What Size Should The Holes Be?
Most jig tables use 5/8” (16mm) holes. This size fits common clamps and fixtures. Space holes every 4 inches for flexibility.
Wrapping Up
Building your own welding jig table is a rewarding project. With careful planning, the right materials, and good technique, you’ll create a tool that improves every weld you make. Remember to check your measurements, reinforce your frame, and add holes for flexibility.
Follow safety guidelines, protect your table from rust, and use it often. With time and care, your jig table will become the centerpiece of your workshop.