Building your own welding table is one of the smartest moves for anyone serious about metalwork. A good welding table makes projects safer, faster, and easier. But making one yourself can feel overwhelming if you’re new to welding or fabrication.
This guide will walk you through every step, from planning to assembly, with practical advice and examples. Whether you’re a hobbyist or aiming for a professional workshop, you’ll learn how to make a solid, reliable welding table that fits your needs and budget.
Why A Welding Table Matters
A welding table is more than just a flat surface. The right table makes welding accurate, stable, and safe. It keeps your workpiece steady, helps you clamp parts, and supports heavy loads. Most important, it protects you from sparks and allows better grounding for your tools.
Many beginners think they can use any old table. But wood or plastic tables burn or melt, and flimsy metal ones bend under heat and weight. A purpose-built welding table is usually made from thick steel, with a flat, strong surface, and legs that don’t wobble.
Key benefits of a proper welding table:
- Safety: Reduces fire risk, keeps sparks contained.
- Precision: Flat surface helps align parts and measure accurately.
- Durability: Handles heavy projects, resists warping.
- Efficiency: Built-in clamps and slots speed up work.
Planning Your Welding Table
Before you start buying materials or cutting steel, it’s smart to plan your table. This step saves time and money, and helps avoid mistakes. There’s no single “perfect” design, but some features are essential for every welding table.
Choosing Table Size
Think about the projects you plan to make. A small table is easier to build and move, but limits your work. Large tables fit big projects but take up more space and cost more.
Typical welding table sizes:
- Small: 2 x 3 feet (good for small jobs, portable)
- Medium: 3 x 5 feet (most common for home shops)
- Large: 4 x 8 feet (professional shops, big projects)
A medium size like 3 x 5 feet is a good balance for most users. Make sure you have room to walk around the table and access all sides.
Deciding Table Height
Most welders prefer tables between 30 and 36 inches high. This range lets you work standing or sitting, and fits most clamps and tools. If you’re tall or short, adjust the height for comfort.
Surface Thickness
For the tabletop, use 1/4 inch steel plate at minimum. Thicker plates (like 3/8 inch or 1/2 inch) are even better for heavy-duty use, but cost more. Thin steel warps from heat and weight, so avoid anything below 1/4 inch.
Special Features
There are extra features you can add for more convenience:
- Clamping slots or holes: Makes it easy to hold pieces in place.
- Wheels or casters: Move your table around the shop.
- Storage shelves: Keep tools handy underneath.
- Grounding lug: Attach welding cables safely.
Plan which features matter most for your needs. Adding too many extras can make your table complicated and expensive.
Comparing Welding Table Materials
Choosing the right materials is crucial. Many beginners waste money buying the wrong steel or mixing metals. Here’s a quick comparison:
| Material | Pros | Cons | Typical Use |
|---|---|---|---|
| Steel Plate | Strong, heat-resistant, flat | Heavy, expensive | Tabletop |
| Square Tube | Light, easy to weld | Less strong than solid bar | Legs, frame |
| Angle Iron | Cheap, good for frames | Not as rigid as tube | Support braces |
| Aluminum | Lightweight | Melts easily, poor grounding | Rarely used |
Steel plate is always best for the top. For the frame and legs, square tube or angle iron works well. Avoid aluminum unless you need a super-light table for TIG welding. Mixing metals can cause corrosion and weak welds.
Gathering Materials And Tools
Once you’ve planned your table, it’s time to gather materials and tools. Here’s a sample list for a medium-sized table (3 x 5 feet):
Materials:
- Steel plate (1/4 inch, 3 x 5 feet)
- Square steel tubing (2 x 2 inch, 16 feet for frame and legs)
- Angle iron (2 x 2 inch, 8 feet for braces)
- Steel bolts and nuts (optional, for detachable legs)
- Casters (optional, heavy-duty, 4 pieces)
- Grounding lug (for safety)
Tools:
- Welder (MIG or stick preferred)
- Angle grinder (with cutting and flap discs)
- Tape measure
- Square
- Clamps
- Marker or soapstone
- Drill (for holes or slots)
- Wrench (for bolts)
Having extra clamps and a magnetic square makes assembly much easier. If you don’t own a welder, you can rent one or ask a local shop for help.

Credit: www.youtube.com
Cutting And Preparing The Steel
Before you start welding, you need to cut your steel to size and clean it. Many beginners skip cleaning, but dirty steel makes weak welds.
- Measure twice, cut once. Use your tape measure and marker to mark cuts on steel tubing and angle iron.
- Cut with an angle grinder or a metal saw. Wear safety glasses and gloves.
- Clean the edges. Remove paint, rust, and oil with a wire brush or flap disc. Clean surfaces with acetone.
- Deburr the cuts. Smooth sharp edges with a grinder to prevent injury.
If your steel plate is heavy, ask for help moving it. Dropping it can cause injuries or damage.
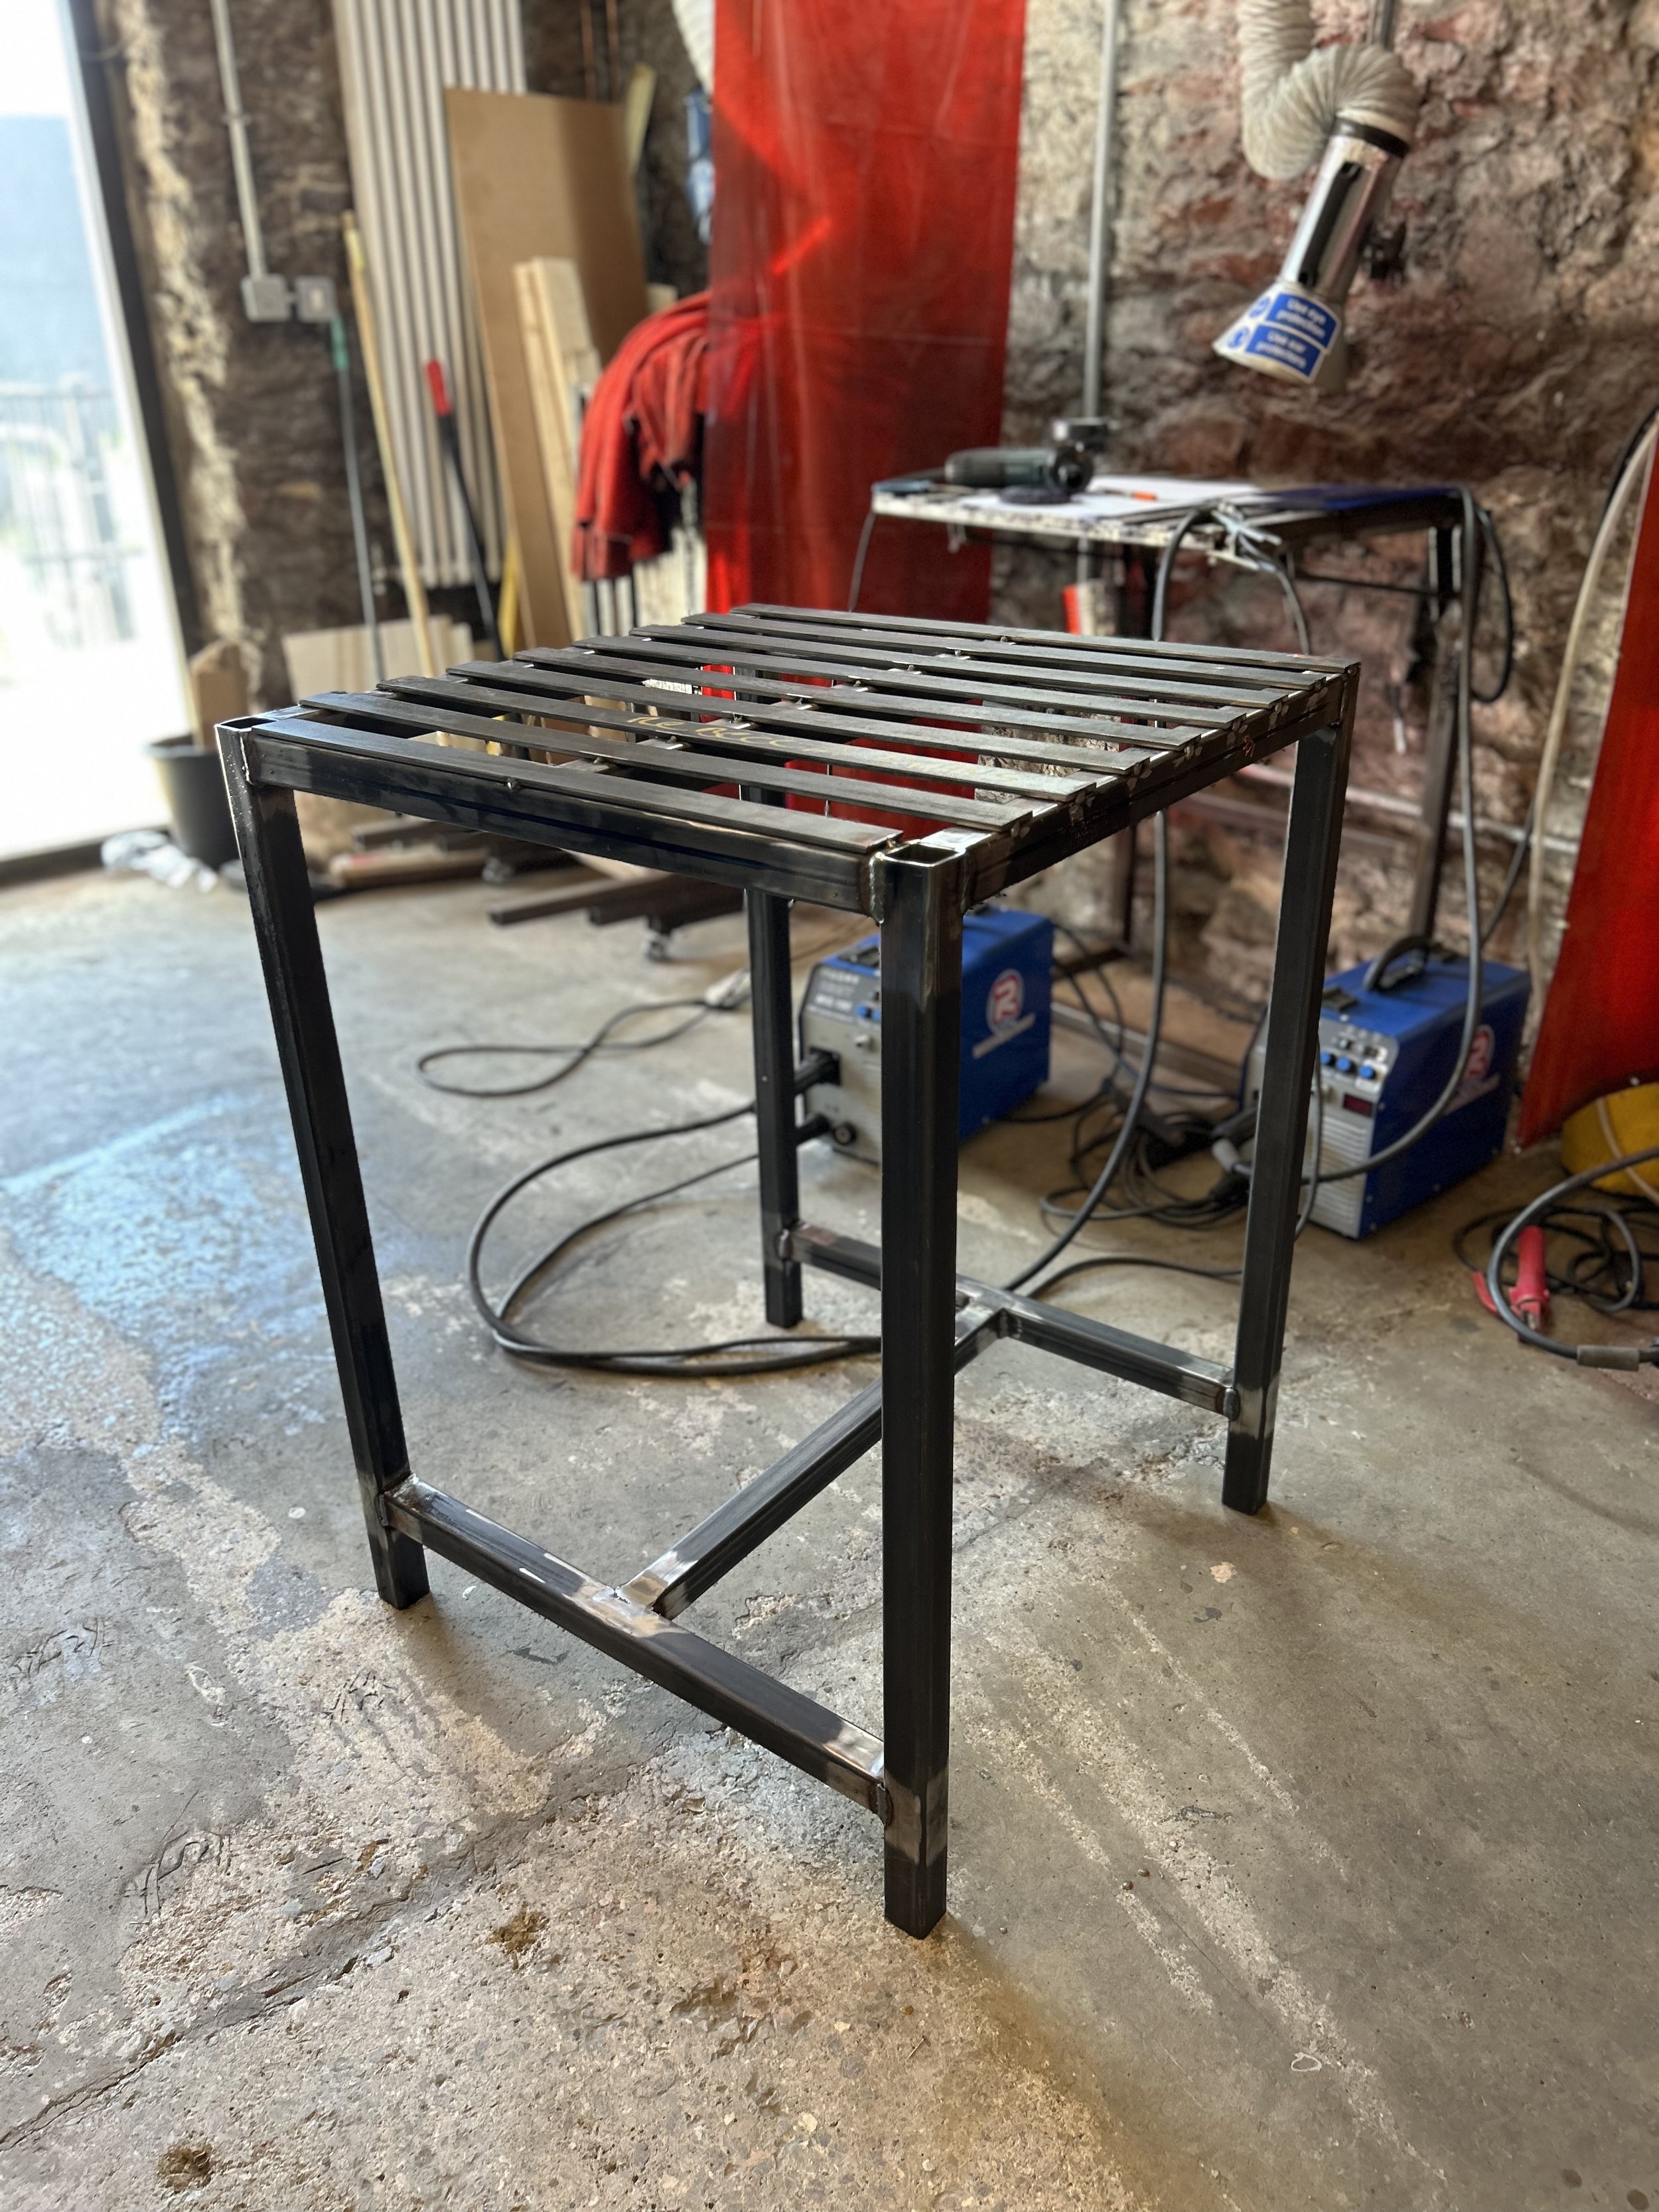
Assembling The Table Frame
Now you’re ready to build the frame. This part supports the tabletop and keeps everything square.
- Lay out the frame. Place the tubing on a flat surface. Use a square to check angles.
- Clamp pieces together. This keeps them steady for welding.
- Tack weld corners. Weld a small spot at each corner. Check for squareness after each tack.
- Add braces. Use angle iron for cross braces between legs. Tack weld these too.
- Check level. Use a level or straightedge to make sure the frame sits flat.
- Finish welds. Once everything is square and level, weld all joints fully.
A common mistake is rushing the welds. If the frame isn’t square, the tabletop will be uneven. Take your time and check measurements often.
Credit: theweldspace.co.uk
Attaching The Tabletop
The steel plate is the heart of your welding table. Here’s how to attach it:
- Lay the plate on the frame. Make sure it overhangs slightly on all sides.
- Clamp the plate. This prevents shifting during welding.
- Tack weld plate to frame. Start at the corners. Double-check alignment.
- Weld around the perimeter. Use short welds spaced every 12 inches. Continuous welding can warp the plate.
- Check for warping. Let the plate cool naturally. If it warps, clamp it down and use gentle heat to flatten.
Many beginners try to weld the whole perimeter at once. This causes warping, making the table useless for precision work. Welding in short sections is safer.
Adding Features And Accessories
You can customize your welding table for your style of work. Here are some practical features to consider:
Clamping Slots And Holes
Drilling holes or slots in your tabletop lets you hold workpieces with clamps. The most common pattern is a grid of 5/8 inch holes spaced every 4 inches. Use a drill press or magnetic drill for clean holes.
Wheels And Mobility
If you need to move your table, add heavy-duty casters. Make sure they can handle at least 500 lbs each. Locking casters keep the table steady during welding.
Storage And Shelving
Adding a shelf under the table is great for holding tools, welding rods, or metal scraps. Use leftover angle iron or tubing for the shelf frame, then add a steel or expanded metal surface.
Electrical Grounding
A good welding table connects to your welder’s ground cable. Install a grounding lug near one corner. This keeps you safe and improves weld quality.
Comparison Of Table Features
Here’s a quick overview of common add-ons and their benefits:
| Feature | Benefit | Cost | Difficulty |
|---|---|---|---|
| Clamping holes | Easy part holding | Low | Medium |
| Casters | Mobility | Medium | Easy |
| Grounding lug | Safety | Low | Easy |
| Under-table shelf | Storage | Medium | Medium |
Welding Safety Tips
Safety is always first. Welding produces heat, sparks, and fumes. Protect yourself and your shop.
Key safety steps:
- Wear welding gloves and long sleeves.
- Use a welding helmet with the right shade.
- Work in a well-ventilated area.
- Keep a fire extinguisher nearby.
- Check for flammable materials before starting.
Many beginners forget about fumes. Welding on galvanized steel or painted surfaces creates toxic smoke. Always clean steel before welding, and use a respirator if needed.
Testing And Using Your Welding Table
Once your table is built, test it before doing real projects.
- Check stability. Push on all sides. The table should not wobble.
- Check flatness. Place a straightedge or level across the surface. Any gaps mean the plate is warped.
- Test clamping. Use your clamps in holes or slots. Make sure they hold securely.
- Connect grounding. Attach your welder’s ground cable to the lug. Check for good electrical contact.
If you find problems, fix them before using the table for real work. Small issues now can become big headaches later.
Cost Estimates And Budgeting
Building your own welding table can save money, but costs vary. Here’s a sample breakdown for a 3 x 5 foot table:
| Item | Estimated Cost |
|---|---|
| Steel plate (1/4″) | $120 – $180 |
| Square tubing | $40 – $60 |
| Angle iron | $20 – $40 |
| Casters (optional) | $40 – $70 |
| Grounding lug | $10 – $20 |
| Misc. hardware | $15 – $30 |
Total cost ranges from $245 to $400 depending on features and local prices. This is much cheaper than buying a ready-made table, which can cost $700 or more.
Practical Tips For Beginners
Here are two insights many beginners overlook:
- Don’t skip leveling: Even small unevenness in your floor can make the table unstable. Use adjustable feet or shims to fix this.
- Avoid continuous welds on the tabletop: Many think more welds mean stronger joints, but continuous welding warps the plate. Use spaced welds instead.
Another tip: If you can’t find a steel supplier, check local machine shops or salvage yards. They often have leftover steel at lower prices.
Common Mistakes To Avoid
Building your first welding table can be tricky. Here are mistakes to watch for:
- Using thin steel for the top: Anything less than 1/4 inch will warp.
- Not checking squareness: If the frame isn’t square, the table won’t be flat.
- Skipping cleaning: Dirty steel makes weak welds and more fumes.
- Overloading casters: If you add wheels, make sure they’re rated for the full weight.
- Ignoring grounding: Without a grounding lug, you risk electrical problems and shocks.
Fixing mistakes later is costly and frustrating. Double-check each step before moving on.
Improving Your Welding Table Over Time
Your first welding table doesn’t need every feature. You can upgrade later:
- Add more holes or slots as you need.
- Install better clamps or custom jigs.
- Upgrade casters for smoother movement.
- Add a vise or other tool mounts.
Some welders even paint their table legs for rust protection, but leave the top raw for better grounding.
Frequently Asked Questions
What Is The Best Steel Thickness For A Welding Table?
1/4 inch steel plate is the minimum recommended for most welding tables. Thicker steel (3/8 inch or 1/2 inch) is better for heavy-duty work but costs more.
Can I Use Aluminum For A Welding Table?
Aluminum is not ideal for most welding tables. It melts easily, does not provide good grounding, and is expensive. Use steel for strength and safety.
How Do I Prevent My Welding Table From Warping?
To avoid warping, weld the tabletop in small sections and let it cool naturally. Avoid continuous welds along the perimeter. Use clamps to keep the plate flat during welding.
Is It Worth Adding Clamping Holes To My Table?
Yes, clamping holes make holding workpieces much easier and safer. They let you use different types of clamps and jigs for precise welding.
Wrapping Up
A welding table is a foundation for many great projects. With careful planning, proper materials, and safe techniques, you’ll build a table that lasts for years. Don’t worry if your first table isn’t perfect—every welder improves with experience. Take your time, check your work, and enjoy the process.
Your new welding table will make every project easier, safer, and more enjoyable.